Monthly Archives: September 2021

Choosing a Japanese Maple

We’re certain you’ve heard it numerous times: fall is the best time to buy your Japanese maple. Have you come into the garden center to pick one? Did the varieties overwhelm you? Let us make it easier for you by explaining Japanese maple differences. Then, when you come in, you’ll know exactly what you want.

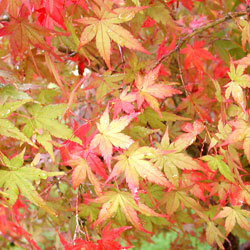
The species Japanese maple, Acer palmatum, moderately grows to a 20′ by 20′ multi-trunked tree. The leaves have 5-9 finely cut lobes giving them a more delicate look than other maples. Red spring leaves turn to green in the summer and blaze with yellow, orange and red in the fall. All do best with protection from drying winds and hot overhead afternoon sun. During their centuries of use in gardens around the world, gardeners have discovered and propagated those selections with unusual growth habits and bark patterns, as well as leaf color and shape. With hundreds of Japanese maple varieties available at garden centers, we feel a little simplification is in order.

  • Leaf Shape
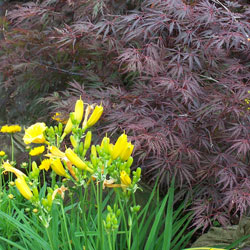
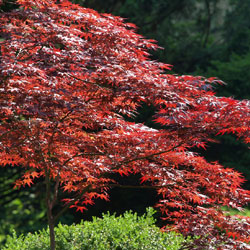
    The variation Dissectum or Laceleaf Japanese Maple has leaves are deeply cut and finely lobed giving a lace cutout look. These varieties generally grow best in shady locations as the leaves easily burn or scorch. The leaves of non-Dissectum varieties are much less lacy. They resemble the leaves of native maples but are smaller and more deeply cut.
  • Leaf Color
    The leaf color of different Japanese maples also varies. Many have red spring growth changing to green in the summer. However, some retain the red through the growing season. Some varieties have variegated leaves with white, cream, gold or pink. Variegated leaves burn easily in the sun but can revert to all green in too much shade. Green leaves tolerate more sun than red. Autumn is when Japanese maples really put on a show with a riot of blazing colors.
  • Tree Form
    Non-Dissectum varieties grow more quickly into upright forms. Some varieties remain less than 10′ tall but others can grow to 25′ tall by 20′ wide. Laceleaf maples slowly develop a weeping form approximately 8-10′ tall and 8-12′ wide. However, ‘Seiryu’ is an exception, growing into an upright form.

Laceleaf (Dissectum)

Non-Dissectum

Location

More shade

Less shade

Size

Smaller

10-25′ tall depending upon variety

Tree Form

Weeping

Upright

Leaf Shape

Lacy, fine cut

Lobed

Leaf Color

Red, green

Red, green, variegated

Now that you have identified a suitable planting location and the type of Japanese maple you prefer, come see us and let our friendly staff show you the varieties that meet your requirements. Autumn colors are blazing now so this is a great time to make your selection.

maple_choosing_4maple_choosing_1

maple_choosing_3

Birdscaping

As wildlife habitats are threatened by development, the creation of a bird-friendly environment that provides food, water and shelter is crucial to the existence of our wild bird population. Caring for our feathered-friends is an educational and enjoyable activity for the entire family that brings beauty and song to our lives.

Benefits of Wild Birds

Birds are great guests to have in your yard, garden or landscape, and they provide more benefits than many homeowners and gardeners realize. Wild birds can…

  • Control insects by feasting on both flying and crawling insects, as well as spiders, slugs, snails and other creepy-crawlies.
  • Pollinate plants by flitting from flower to flower as they seek out insects or eat seeds, taking pollen along between blooms.
  • Manage weeds as they consume copious amounts of weed seeds before the seeds ever have a chance to sprout.
  • Control rodents when raptors visit the yard in search of mice, rats, gophers, voles or other unwanted pests.

Attracting Backyard Birds

Fortunately, it is easy to attract a wide variety of backyard birds when you offer them what they need most – food, water and shelter.

Food for Birds

Wild birds rely on both natural and supplemental food supplies so it is important to consider both when birdscaping. Feeding the birds is most important in the winter when natural food is scarcer, but they will visit feeders at any time of year. Migratory birds require additional food in the spring and fall as they pass through the region and nesting birds will utilize feeders in the summer.

Tips:

  • Provide a variety of natural foods for birds by planting berry bushes, seed-bearing flowers, nectar-rich flowers and sunflowers. Leave windfall fruit on the ground for birds to nibble. Minimize pesticide use so birds can feast on insects as well.
  • Add supplemental feeders to your yard, such as birdseed feeders, suet feeders and nectar feeders. Clean feeders weekly to avoid mold that can be dangerous to birds, and be sure feeders are full when birds need them most.

Water

Improve your backyard bird habitat by adding water. Birds require a constant supply of clean water for drinking and bathing. This is especially important in late summer, when water is scarce, and in the winter, when it is frequently frozen.

Tips:

  • Place bird baths in a protected location safe from predators, and keep the baths filled at all times so a fresh supply of water is constantly available.
  • Scrub off algae as soon as it is appears and thoroughly was the bird bath each week to minimize feces contamination or other messes in the water.
  • Provide motion for greater attraction by using a bubbler, wiggler, dripper or fountain. Birds will see the sparkles of the moving water and will hear the splashes from great distances, so more birds will visit.
  • Use Mosquito Dunks to safely prevent mosquito larvae in warm weather. A clean bird bath with moving water will also harbor fewer insects.
  • Add an outdoor-safe submersible heater to the bath in winter to keep the water liquid instead of frozen, or consider using a fully heated bird bath during the coldest months.

Shelter

It is important to offer safe and comfortable shelter for your wild birds to nurture their young, protect them from predators and shield them from the elements. Planting evergreen trees and shrubs and providing bird houses, along with roosting boxes and pockets, are all beneficial additions to your birdscape.

Tips:

  • Choose both deciduous and evergreen landscaping trees and shrubs to offer birds different types of shelter in all seasons.
  • Minimize pruning to give birds denser, more secure shelter to take advantage of when they feel threatened.
  • Plant in layers and create thicket-like pockets or corridors in your landscape so birds can move around freely without feeling exposed.
  • Supplement the shelter in your yard with good quality bird houses, winter roost boxes or nesting pockets to give birds even more options to stay safe and secure.

When you meet birds’ needs for food, water and shelter, your birdscape will soon be home to a fun and friendly flock of backyard birds.

Birdscaping_3

Birdscaping_1

Birdscaping_2

Repotting Houseplants

Fall is an excellent time to repot many houseplants. Potted plants that have been growing outdoors during the summer have probably grown quite vigorously due to the high light levels and greater humidity. If the top growth of the plant has increased in size by 20 percent or more, it probably should be transplanted into a larger container so the roots can stretch and settle comfortably.

Before You Repot

Before repotting, check the plant and the soil carefully for insects.  Add systemic granules to the soil and spray the leaves with an insecticidal soap to remove any unwanted pests. If an insect infestation is particularly bad, it may be necessary to remove most of the plant’s soil and replace it with fresh potting soil. Avoid using soil from the garden, however, which will harbor insect larvae and eggs as well as weed seeds and other material you do not want in your houseplants.

Acclimating Plants

Bring your plants indoors well before any danger of frost for proper acclimation to the indoor environment. The change in light levels and humidity could shock more delicate plants, and they may wilt temporarily or drop leaves before they adjust to the new conditions. If possible, bring them in just a few minutes at a time for several days, gradually increasing their indoor time to several hours before keeping them indoors all the time. Flowering tropicals will also benefit from cutting back some of their foliage to avoid shock before being brought indoors.

To help houseplants overcome the transition from outdoors to indoors, position them in a bright, sunny area and consider adjusting indoor temperature and humidity controls to more closely mimic outdoor conditions. Make adjustments slowly and gradually, and the plants will adjust.

Time to Repot

Once your houseplants are adjusted to their indoor fall and winter environment, they can be safely repotted without adding to their stress. Repot the plants early in the day, and move them to a slightly larger pot. Avoid jumping several pot sizes, which could lead to excessive root growth while the foliage is neglected. Be sure to fertilize and water the plants appropriately to provide them proper nourishment as they settle into new pots. Do not expect luxuriant foliage growth right away, however, as it will take some time for the plants to begin growing again, especially in fall and winter when most houseplants are entering a dormant, slow growth period.

By repotting your houseplants in fall, you can help healthy, vigorously growing plants adjust to a new environment and continue their growth with ease in a new, larger, more comfortable pot.

Repotting_1

Fall Lawn Care

Fall is the best time of the year to overseed your existing lawn or establish a new lawn. If your lawn is a bit thin, has bare patches or needs good care, now is the time to take care of it so it can become thoroughly established before warm temperatures arrive in spring.

Overseeding A Weak Lawn

A weak lawn may have thin or scraggly patches, seem overrun with weeds or have bare patches that are difficult to keep green and lush. Overseeding can help eliminate these problem areas and create a more consistent, luxurious lawn.

  1. Spray broadleaf weeds with a selective herbicide and wait 2 weeks for the weeds to disappear. Several treatments may be necessary if the yard is thick with weeds.
  2. Take a soil sample of your lawn to determine the pH. A garden extension service can help determine pH levels, or home test kits are available.
  3. Mow shorter than normal and rake clean to remove unnecessary debris that may keep seeds from reaching the soil.
  4. Core aerate if you have compacted soil or heavy thatch. Remove the cores and dispose of them properly to keep the soil light and airy for seeding.
  5. Apply starter fertilizer and lime if determined to be needed by the pH test, or choose a grass type that will thrive in your soil’s conditions.
  6. Dethatch your lawn if thatch is thicker than ½ inch. This can be done with heavy raking or a special dethatching rake may be necessary in extreme cases.
  7. Overseed with the proper seed. If core aerating, lightly topdress with topsoil or humus.
  8. If needed, cover the freshly seeded area with netting or hay to discourage birds or other wildlife from consuming the seed before it grows.
  9. Water daily until grass has germinated, then soak once a week to encourage deep root growth.
  10. Fertilize in late fall with fall fertilizer.

Seeding A New Lawn

If you have no existing lawn or the entire ground is overrun with nothing but weeds, it may be best to start from scratch and create the lawn of your dreams.

  1. Kill existing vegetation with nonselective herbicide. If you want to preserve nearby trees or shrubs, take steps to protect that vegetation from the treatment.
  2. Take a soil sample of your lawn to determine the pH. A testing kit can provide a good pH estimate, or a gardening center or garden extension service can provide a more precise evaluation.
  3. Prepare soil by breaking up the surface with a rake or spade using a crisscross pattern. All large lumps should be broken up, and any large rocks should be removed.
  4. Broadcast starter fertilizer, lime and gypsum as determined by the pH test. This will provide a nutrition boost for fresh seeds.
  5. Spread topsoil or humus to a ½ inch depth for appropriate planting.
  6. Rototill to a depth of 4 inches and grade smooth. This will mix all the top layers together for uniform soil and nutrition, ensuring even turf growth.
  7. Sow proper seed and mulch lightly with salt hay to control erosion and conserve moisture.
  8. Water daily until grass has germinated, then soak once a week to encourage deeper root growth to resist droughts and repel weeds.
  9. Fertilize in late fall with fall fertilizer to provide nutrition throughout the season.

Which Seed?

Not every lawn will thrive with the same type of grass seed. Allow our staff to help you select the seed that best suits your needs, soil type and planting conditions. Apply at the recommended rate and incorporate into the top ¼” of soil. Do not bury the seed or it may not germinate evenly.

No matter what the condition of your lawn, fall is the best time to take steps to help it rejuvenate so you have an amazing lawn to enjoy in spring.

FallLawn_2FallLawn_1

Fall Horticultural Oil Application

Autumn is an excellent time to apply horticultural oil. The oil smothers many soft-bodied insects and hard-shelled scales that are impenetrable to many insecticides, and can therefore help control some of the most stubborn insect populations. But is it right for your plants?

About Horticultural Oil

Horticultural oil, or hort oil, is typically derived from petroleum, and is a type of ecologically-friendly mineral oil. Some cottonseed and soybean oils can also be effective horticultural oils. Emulsifying agents are typically added to these oils so they can be mixed with water and used as a spray, which helps distribute them evenly over plant foliage to be most effective.

Pests That Don’t Like Horticultural Oils

Different types of horticultural oils can be effective against many unwanted garden pests, including…

  • Spider mites
  • Aphids
  • Whiteflies
  • Mealy bugs
  • Psyllids
  • Lace bugs
  • Caterpillars

In addition to smothering the larvae or insects directly, the heavy oil also makes it difficult for many insects to crawl therefore starving them to death and preventing them from spreading diseases from plant to plant. Additionally, the oil repels many insects looking for winter homes. The oils also act as fungicide against powdery mildew, rust and leaf spot on some plants.

Applying Horticultural Oils

Application of horticultural oils is easy, requiring only a simple hose-attached sprayer. Because oil and water do not mix, frequent agitation by shaking is required even if the oils are mixed with other agents to be more sprayable. These products are most effective if applied when plants are dormant, since oil-based products can burn and harm actively growing foliage, buds, flowers and fruit. Some lighter weight, summer-formulated oils are available, but they should be used only sparingly and only if absolutely necessary. Autumn and winter are the best seasons to apply horticultural oils when insects are a problem, though autumn applications can occasionally cause problems with plants dying back and other winter damage. Because the oils can evaporate and dissipate quickly, they should only be used when insects are present, otherwise they will be ineffective. In freezing weather the oil coverage will be inconsistent, so cool but not bitterly cold temperatures are best.

Of course, always follow the instructions for proper application rates, plant sensitivity and ideal weather conditions to ensure the most effective treatment. Because these oils are still pesticides, protective gear such as gloves and goggles should also be worn to avoid accidental irritation or more severe contamination.

Using hort oils can be a great way to control insects on your plants, but only if the oils are used appropriately. Come in for a consultation to see if these products can help end your insect problems.

FallHortOIl_1

Japanese Beetle Reduction Methods

Japanese beetles can be a scourge of the garden and landscape, but what can you do to keep these pests at bay?

About Japanese Beetles

Japanese beetles (Popillia japonica) spend their early lives as underground grubs eating turf grass roots. They prefer well-watered, healthy perennial ryegrass and hard fescues in full sun. Emerging as adult beetles in mid-June through July, they begin feeding on over 200 varieties of plants, including shade and fruit trees, shrubs and ornamentals. They also mate and the females lay 50-70 eggs in the soil.

The eggs hatch in the fall and white C-shaped grubs begin eating roots. Autumn is the best time to check your lawn to see if the grubs are present. Dig several one-foot squares 6″ deep in your lawn, turning over the turf and looking for these distinctive grubs. If you find them, taking action immediately can help control the infestation.

Reducing Japanese Beetle Populations

Non-chemical preventative treatments include spraying beneficial nematodes such as Heterorhabditis or Steinernema onto moist lawns and soil in September. Nematodes, naturally occurring soil organisms, are parasitic to soil grubs and many insect larvae, including Japanese beetles. Spray in the evening and ensure the soil is moist to at least 6″ deep. One product, Lawn Guardian, contains two types of nematodes; one lives deeper in the ground to give a “double whammy” to the feeding grubs.

Natural predators include ground beetles, ants and Tiphia, a parasitoid. Applying Bacillus popilliae Dutky to the soil causes “Milky Spore Disease” to the grub. Chemicals to control the grubs include trichlorfon, imidacloprid, halofenozide or thiamethoxam, so look for pesticides that include these compounds to help eliminate Japanese beetles. Neem oil can also be helpful to control these pests. As always, read and follow the directions carefully when using any type of chemical pesticide.

In the garden, row covers can help minimize Japanese beetle populations during the growing season, but this can also reduce crop productivity as fewer flowers are pollinated. Still, if an area is heavily infested with Japanese beetles, a smaller crop may be a better alternative than accidentally nurturing these pests. If only a few beetles are present, hand-picking them off plants and killing and disposing of the insects – toss them in a bucket of soapy water – can keep the populations manageable.

For the latest information and updates on Japanese beetles, as well as more control tips, contact your favorite garden center or County Agent.

beetle_1JapaneseBeetle_2

Freshen Up for Fall

Transform summer garden pots, planters and window boxes into magical displays this fall. The addition of mums, winter pansies and ornamental cabbage and kale are always excellent choices but you can really spice things up with the inclusion of a few of these colorful, cold-hardy selections. Which ones will look best for your autumn landscape?

  • Acorus gramineus ‘Ogon’
    This graceful, fan-shaped acorus variety is ideal for adding height to plantings. It keeps its color and shape into the winter for visual interest as other plants lose their vibrancy.
  • Acorus gramineus ‘Variegatus’
    This is the white-variegated version of ‘Ogon’. Its white-green striping is the perfect complement to mixed planting in silver, pink, purple or blue, and its lightness adds freshness to the arrangement.
  • Ajuga reptans ‘Burgundy Glow’
    This ajuga has a trailing habit and pretty, variegated leaves. Its blue flowers are scattered in fall and summer but this plant blooms profusely in springtime.
  • Ajuga reptans ‘Mahogany’
    The rich mahogany color of the shiny, short-stemmed leaves turns darker and more lustrous in the winter, ideal in a frosted or snowy landscape. Pretty bright blue flowers punctuate this creeper, mostly in the spring.
  • Ceratostigma plumbaginoides ‘Leadwort’
    The prolific flowers of this plumbago are an intense gentian-blue and the foliage turns bright red in low temperatures, adding visual heat to the landscape even on cold days.
  • Euphorbia amydaloides ‘Purpurea’
    This pretty perennial is exceptionally frost resistant. ‘Purpurea’ features upright branches with leaves that form a rosette pattern and turn from reddish to purple in the cold.
  • Helichrysum thianschanicum ‘Icicles’
    Here’s an easy, fast-growing helichrysum variety with striking, velvety-silver leaves and a compact growth habit.
  • Lamiastru galeobdolon ‘Herman’s Pride’
    ‘Herman’s Pride’ has serrated, shiny silver leaves with green venation and yellow flowers in the spring. The plant trails as it grows, making it perfect as an accent in hanging baskets, taller containers and window boxes.
  • Lavendula lantata ‘Silver Leaf Lavender’
    This lavender variety has silvery-white leaves that are velvet-like to the touch and hold their color throughout the winter. Dark purple-blue flowers appear by the second year and contrast beautifully with the foliage.
  • Lysimachia nummularia ‘Goldilocks’
    Proven to do equally well in both sun and shade, ‘Goldilocks’ exhibits wonderful versatility. The golden foliage creeps and hangs in lush profusion of round, shiny leaves.
  • Salvia officinalis ‘Icterina’
    This sage has a glowing, golden-yellow variegated leaf. ‘Icterina’ maintains its shape and holds its color long into the winter.
  • Salvia officinalis ‘Purpurascens’
    The eggplant-colored leaves of this sage warm up any planting. Try it as a culinary herb as well and enjoy the subtle taste.
  • Salvia officinalis ‘Tricolor’
    ‘Tricolor’ offers a unique combination of purple leaves with white borders that turn pink when temperatures drop.

No matter which of these plants you opt for, you’ll enjoy the rich colors and variation they bring to your autumn plantings.

freshen-1

freshen-2

Fall in Love with Fall Pansies

Ideal for fall gardens, pansies offer a colorful display for almost six months – in the fall when they are planted, in the winter during a stretch of sunny days and again in spring! Winter pansies may be planted anytime starting in mid-September and continuing through October. Multiple plantings spaced a week or two apart can also ensure even more blooms to enjoy throughout otherwise drab months.

Planting Pansies

As with any plant, pansies perform better if the soil that you place them in is well prepared. Choose a planting location that is well-drained and work in 4-6 inches of rich organic matter, such as garden compost, peat moss or Bumper Crop. Plant pansies at about the same level, or slightly higher, than they were growing in their market packs or containers, taking care not to plant too deep or the plants may wilt and rot and the roots could smother. After planting, mulch and water the bed thoroughly. Remember to check the plants often during the first three weeks after planting or until new growth begins, to ensure adequate moisture necessary for healthy growth. Because these plants require very little care, no other maintenance is usually necessary for them to reach their full potential.

Where to Plant Pansies

These versatile blooms can be used in many different parts of your garden or landscape. Add a graceful drift of single-colored pansies or a mass of mixed colors to brighten a border, under a tree or along a fence, pathway, deck or wall. Try tucking single plants in garden beds around perennials and shrubs that have finished blooming to brighten up an otherwise dreary section of the landscape and to help mask older, spent growth. Pansies also do well in containers placed on a deck or patio or next to the entrance of your home to greet your guests with welcoming color. Try pansies in a hanging basket and you can even move them indoors to enjoy when the weather is too poor for outdoor gardening. A small container of fall pansies can also be a great gift for winter holidays, birthdays or just to brighten the day of anyone who could use a touch of color in their life.

With so much color to enjoy in so many ways, fall and winter pansies should be a staple of any garden and will bring great gardening joy to the landscape even during colder, dreary months.

fall-pansies-1

fall-pansies-2

fall-pansies-3

Tulips: Spring Starts Now!

Members of the lily family, tulips are native to central and western Asia. In the 16th century, they were introduced to the Netherlands where most tulip bulbs are grown today. With over 100 species and nearly 3,000 varieties, tulips have been divided into 14 groups, including Darwin hybrids, Triumph, Lily-flowering, Double early, Rembrandt, Scheepers’ Hybrids (or French) and Parrot variations. Their classification is based on form and habit. A 15th group includes species tulips with the smallest plants growing to just 3 inches.

Tips for Planting Tulips

Tulips are an easy care addition to any landscape, and they are easier to plant than many gardeners realize.

  1. Choose only top-sized bulbs without any bruises or obvious damage. Bigger bulbs generally indicate better quality and bigger flowers.
  2. Plant bulbs as soon as purchased or store in a cool, dry location.
  3. Choose a sunny (or part sun) location with well-drained, rich soil.
  4. Plant 2” deeper than recommended to promote re-blooming each year.
  5. Apply bone meal 3 times a year – in fall when you plant, in spring as bulbs emerge from the ground and after flowering has finished. This will provide food for the foliage and bulb growth for next year’s flowers.
  6. Protect tulip bulbs from pest damage by laying wire mesh on top of your bed just beneath the soil. Sprinkling VoleBlok in the holes when planting can also be helpful.
  7. Mulch and water the bed thoroughly after planting.
  8. Plant before the ground freezes.
  9. Deadhead flowers after they have faded, but leave the foliage to die back naturally. Do not cut off the leaves until they have turned brown, or else they will not develop large enough bulbs for a good show the next year.

Tulip Timesaving Tip

Don’t have much time to plant a large, luxurious tulip bed? Plant 100 tulips in just 1 hour!

  1. Choose a part to full sun location and dig a hole 6’ x 6’ to a depth of 6-8”, placing the displaced soil on plywood or cardboard.
  2. Place 100 tulips, pointed end up, evenly over the area.
  3. Gently slide the soil from the plywood or cardboard onto the tulip bulbs. Tamp the soil lightly, sprinkle the bed with bone meal and water well. In spring, the entire area will bloom!

Tried & True Tulip Selections

Some tulips can be finicky, and while some tulips will disappear from your garden after a year or two, these selections promise trouble-free blooms for years!

  • ‘Daydream’ – Darwin tulip, changing colors while in bloom to vibrant apricot-orange, blooms mid-April into May, Ht: 22”. Fragrant.
  • ‘Lilac Wonder’ – Species tulip, large rose-lilac flowers with yellow bases and anthers, blooms May, Ht: 7”. Prefers full sun.
  • T. praestans ‘Fusilier’ – Multi-flowering species tulip, orange-scarlet flowers, blooms April, Ht: 8-12”.
  • T. clusiana var. chrysantha – Species tulip, good naturalizing tetraploid, deep yellow flushed with rose toward the edges, blooms April, Ht: 8”.
  • ‘Pink Impression’ – Darwin tulip, huge flower with strong, clear pink flowers, blooms mid-April to May, Ht: 22”.
  • ‘Menton’ – Scheepers’ hybrid, blooms are shades of apricot, rose, pink and peach, late-blooming, Ht: 26”.
  • ‘Mrs. John T. Scheepers’ – Huge Scheepers’ hybrid, golden-yellow tetraploid is a three-time award winner, late-blooming, Ht: 26”.
  • ‘Persian Pearl’ – Species tulip, deep magenta-rose with buttercup yellow star on the inside, blooms April, Ht: 6”.
  • ‘Maureen’ – Scheepers’ offspring, large, oval-shaped flowers of glistening white, blooms late-May, Ht: 28”. Four-time award winner!
  • ‘La Courtine’ – A Scheepers hybrid, yellow flowers are oval-shaped, flamed with red from the bottom up, late-blooming, Ht: 26”.

With so many to choose from, it’s always time for tulips!

tulip-2tulip-3tulip-1

Bringing Your Tropical Plants Indoors for the Winter

As the summer comes to an end and autumn approaches, the days get shorter and cooler temperatures signal the time to ready your plants for winter. How can you protect your treasured tropicals from winter damage?

Overwintering Tropical Plants

Don’t wait until frost warnings or freezes occur to bring tropical plants inside, especially since these plants are more susceptible to dropping temperatures. Try to have all of your plants acclimated to the new indoor environment by the end of October. Avoid the temptation to move your tropicals back outside if it suddenly gets warm, because they will have to re-acclimate when you bring them back inside again. With a little extra care even exotic hibiscus can be over-wintered inside the house.

First, it’s a good idea to prune approximately one-eighth to one-fourth off the total height of the plant’s foliage. This helps reduce the shock that the plant receives with the change of conditions when bringing them indoors. Check the plants for signs of insects and treat them with insecticidal soap or pyrethrin spray as well as a systemic insecticide that will provide protection for up to six weeks.

Position indoor tropical plants in a very bright location that receives no less than 6 hours of light per day. If the winter is very cloudy, supplement your plants with an artificial light source. Be sure the room is warm, but avoid putting the plants too close to a heating vent, which can dry them out drastically.

Because they are tropical plants, they will need good humidity which can be achieved by using a humidity tray. Use a saucer that is at least 3-4 inches larger than the pot and fill it with an inch of stones. Pour water over the stones until they are half covered, then place the pot on top of the stones. The humidity immediately around the plant will be increased, but avoid setting the pot directly in any water, which can lead to fungus and rotting. Grouping several plants close together can also help them preserve humidity for more luxuriant growth.

Fertilizing should be continued throughout the winter, but at a rate of once per week. You will find the plant will not utilize as much water in the winter because its growth has slowed. Generally, plants should be watered every 4-7 days depending on location, pot size, soil type and plant type.

If you have any questions about winter care of your plants, our staff will be glad to help you keep your tropicals in good condition all winter long.

tropical-2

tropical-1