Monthly Archives: September 2021

Problems With Your Compost Pile? Fix Them!

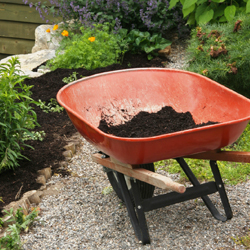
A compost pile should be part of every gardener’s yard, since it adds so many benefits for recycling and providing organic material in the garden. There are times, however, when it can be tricky to keep a compost pile in peak condition and breaking down material most efficiently. If you encounter any of these common problems, you can easily correct them and keep your compost pile at its best.

  • Pile is Too Dry
    Without adequate moisture, beneficial microorganisms cease to function and decomposition stops, turning a compost pile into a clumpy mess that does not decay into usable organic material. Keep the pile moist at all times, but not overly wet. A dampness like a squeezed sponge is ideal. It may be necessary to use a hose to water your pile occasionally, or a tarp or piece of plastic over the top of the pile can help keep moisture in the pile instead of evaporating.
  • Foul Odor
    A stinky compost pile is no gardener’s friend, and over-watering the pile will compact the material. When air space is decreased, the pile becomes anaerobic, resulting in an unpleasant odor. Turn the pile frequently to increase aeration and add larger pieces of dry, porous, carbon-rich material such as wood chips or straw to absorb excess water and improve air circulation.
  • Pile is Cool
    Check all the items required for a hot, quickly-decomposing pile: carbon, nitrogen, air and water. Correct any deficiencies. Another issue may be that a pile that is too small will have difficulty insulating itself. Increase the size of your compost pile by adding more material so it can generate sufficient heat from decomposition to keep itself warm.
  • Pests in the Pile
    While insects and worms are welcome helpers in a compost pile, a poor pile may also be attracting mice, rats, squirrels, raccoons and other wildlife. This usually means that the wrong material was used for composting. Never add meat, fish, bones, dairy products or oily food to the compost pile, all of which can have strong odors that will attract unwanted wildlife. Similarly, no human, cat or dog manure should be added to the pile. Avoid adding weed plants or diseased plants as well, since those weed seeds or disease spores could be transmitted to your garden or landscape when the compost is spread.
  • Poor C/N Ratio
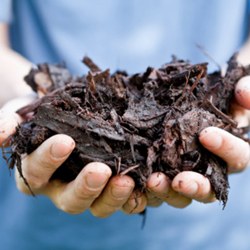
    When planning the optimum conditions for compost decomposition, the standard recommendation is 3-to-1; three parts carbon to one part nitrogen. Carbon-based material is brown and nitrogen-based material is usually, but not always, green. Chopping or shredding additions to the compost pile will speed up the decomposition and help keep the pile balanced.

    The best materials to add to your compost pile include…

    Brown Material (Carbon-Based)
    – Dried, dead Leaves
    – Shredded paper, including newspaper
    – Wood ash
    – Sawdust
    – Eggshells
    – Chipped brush and wood chips
    – Straw and twigs

    Green Material (Nitrogen)
    – Grass clippings and sod scraps
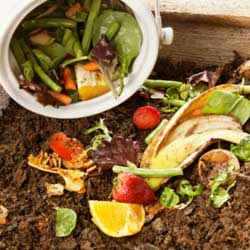
    – Vegetable and fruit peels, scraps and rinds
    – Disease and insect-free plant material, such as clippings and prunings
    – Horse, cow, chicken and rabbit manure (herbivores)
    – Coffee grounds and used coffee filters
    – Used tea bags
    – Used potting soil

No matter what issues your compost pile may be having, problems are easy to correct and you can quickly adjust your pile to be productive and efficient. Before you know it, you’ll have plenty of rich, nutritious compost to nurture your garden and landscape all year long.

compost-1

compost-3

compost-2

Get Started Composting

Fall is an excellent time to start a compost pile with all of the leaves falling, and if you develop compost now, you will have a rich source of organic material for your garden and flowerbeds in spring. Getting started with compost is fairly simple if you keep in mind the following…

  • Size Matters
    Smaller particles break down faster than larger chunks. Shredding or mulching garden wastes will help speed up the process and develop usable compost faster. Chop up larger pieces of household materials before adding them to your compost pile to speed up their decomposition.
  • Take a Turn for the Better
    Turning helps aerate the pile and shifts outer parts closer to the center where they can heat and decompose more effectively. A well-mixed pile will also have better consistency and more evenly distributed nutrients. Use a pitchfork, spade or rake to gently turn your pile periodically, such as once every 1-2 weeks or whenever you add a large amount of new material to the pile.
  • Know What to Compost
    Materials that can be composted are sod, grass clippings, leaves, hay, straw, manure, chopped corncobs, corn stalks, sawdust, shredded newspaper, wood ashes, hedge clippings and many kinds of plant refuse from the garden. Some household waste, such as coffee grounds, banana peels, eggshells and vegetable peelings are also ideal for a compost pile and will reduce the trash you accumulate.
  • Avoid Unwanted Materials
    Materials to avoid composting are large amounts of weeds, grease, fat, meat scraps and bones, cheese, coal ashes, diseased plants, cut weeds and charcoal. These materials do not decompose readily and can create poor quality compost. For example, meat, grease or dairy products in your compost will begin to smell strongly, which could attract rats, raccoons or other unwanted visitors. Diseased plants or weeds can survive in a compost pile, contaminating your garden when you add the compost to the soil in spring.
  • Cover as Needed
    Covering your compost pile with a tarp or large piece of carpet can help preserve the heat and moisture essential to promote appropriate decomposition. The cover can also keep the pile from freezing or getting too wet in winter conditions, and it can easily be removed to add new material or turn the pile as needed.

Before you toss out your next bag of trash, check for compost material and start your pile today! Your garden will thank you tomorrow.

compost_2

compost_1

Gardener Holding Tree Bark Mulch

Over-Wintering Container Plants Outdoors

All containerized plants that are considered hardy in your zone can spend the winter outdoors, but you do need to take a little special care to keep them safe and comfortable as temperatures drop. Despite their hardiness, winter is still a challenging season, but it is possible to keep your container plants healthy until the days grow longer and warmer again.

Options to Overwinter Your Container Plants

  • In the late summer or fall, removed the plant from its container and plant it in the ground while the soil is still warm. Another method is to bury the pot, with the plant in it, in the garden and remove the pot following spring. Both of these methods will help insulate the root system, preventing it from freezing solid and killing the root system.
  • Place containerized plants in an unheated garage but along a heated wall. This is an excellent method for very large pots or porous pots that tend to break apart from the constant cycle of freezing and thawing, and so would not be very hardy if buried. For extra root protection and insulation, wrap the pots in plastic bubble wrap or wrap an old comforter or quilt around the pots.
  • Group pots together along the sunny side of your house or shed. If this area is windy, create a windscreen with stakes and burlap. Place bales of straw or hay around the perimeter of the grouping up against the pots to further protect plants from cold winds. Fill in areas between pots with mulch, shredded leaves, grass clippings or hay for insulation. Lay evergreen branches or place a layer of mulch on top of the pots for additional protection.
  • Use a cold frame covered with plastic or Reemay fabric to help control temperatures and reduce light as well, helping plants stay dormant in winter. It will still be necessary to use mulch, shredded leaves or hay around and in-between pots for insulation. Rodent control, such as Havahart traps, may be necessary when using this method.

Watering Container Plants in Winter

Make sure that plants go into the winter with moist soil so that there is water available to plant roots. Check soil moisture occasionally, never allowing it to dry completely. It is also a very good idea to spray needled and broadleaf evergreens with an anti-desiccant. This acts as a protective coating for plant foliage and stems as it helps them retain moisture.

With just a little care and forethought, you can easily prepare containers for winter without risking the plants and arrangements you have so carefully cultivated.

over-winter-2
over-winter-1

Devil’s Darning Needle

Fall is here and after hiding inside in the cool comfort of our air conditioning through the hottest, driest, buggiest time of the year, our interest in revisiting the outdoors is renewed. Reemerging from self-imposed exile into the garden, it is pure joy and a relief to witness the tenacity of late season bloomers that have had to bear, with no assistance or relief, the dog days of summer. One such plant, reliable and prolific, is Clematis virginiana, better known as Devil’s Darning Needle.

Devil’s Darning Needle – also called Devil’s Hair, Love Vine and Woodbine – is a North American native vine. It is very similar in habit and appearance to the Japanese native, Sweet Autumn Clematis (C. terniflora) that most of us are familiar with, yet Devil’s Darning Needle is not as aggressive and can be better controlled in the landscape. C. virginiana is a vigorous, twining, deciduous vine, growing about 15 feet in a season. This plant is in best form when planted next to a supporting structure such as an arbor, trellis, fence, tree or shrub. Its quick growth rate makes this an excellent choice where quick privacy is needed, such as along a fence, shielding a patio or forming a wall around a deck. If unsupported, it will sprawl along the ground.

What makes this plant so alluring is its annual, overwhelming display of 1 and 1/4 inch, highly fragrant, star-shaped, pure white blossoms produced in billowy masses in the fall followed by ornamental, silvery, plume-like seed heads. Both flowers and seed heads work well in floral arrangements. Either in the yard or in a vase, this prolific bloomer will not disappoint.

Devil’s Darning Needle is easy to grow. As a low-maintenance vine, it is rarely troubled by pests or disease. It performs well in moist to wet soil of average fertility and prefers full sun to part shade, although it will thrive and bloom in considerable shade. Supplemental watering may be necessary during times of drought. In late winter or early spring, prune C. virginiana back hard to about one foot from the ground to encourage spring growth, but be certain to leave at least two strong buds on each stem. During the growing season, monitor the vine if it is growing through a shrub to make certain that the shrub is not being overwhelmed. No special care is needed to trim it back to control size, but it can be pruned for shape if desired.

Devil’s Darning Needle can be an amazing addition to your landscape, and its late summer and early fall beauty is sure to delight just when other plants begin to fade.

clematis_250x250_2clematis_250x250_1

Minor Bulbs: Perfect Partners for Early Spring Color

A garden stroll in the early spring offers a great deal of promise but generally little color. You can rectify this with a little planning and planting this fall to ensure bright spring blooms to enjoy.

What Is a “Minor” Bulb?

Often passed over at the garden center for showy, larger-flowering bulbs, minor spring bulbs give the garden a head start on spring, extending the season by blooming as early as February and March. These beautifully blossomed seasonal gems are short in stature and produce daintier flowers but, when planted en masse, make as powerful a statement as any daffodil, tulip or hyacinth planting.

Chionodoxa, Muscari, Eranthis, Galanthus and other minor bulbs are planted at the same time as tulips, daffodils and hyacinths, and in the same way, although not so deeply. The general rule of thumb is to plant bulbs three times as deep as the bulb is high. Your soil should be well drained so the bulbs do not rot. Don’t forget to include bone meal in the planting hole for strong growth in the spring.

Minor bulbs make perfect partners for all of your other traditional spring-flowering bulbs. Their size makes them suitable for rock gardens and walkways, as well as filling in spaces between other spring bloomers. They also naturalize well and will help fill in any gaps in a spring garden or wildflower lawn.

Top Minor Bulbs

There are many lovely bulbs with smaller, stunning spring flowers to choose from. Some of the most popular and versatile options include…

  • Chionodoxa (Glory of the Snow): Small, 1 inch white-centered blue or pink flowers appear on leafless stems. Plant in large groups in front of early blooming shrubs or naturalize in the lawn. When grown in shade, blooms last several weeks. Plants grow 4-10 inches tall.
  • Muscari (Grape Hyacinths): Offering the rare and cherished blue color in the garden, Muscari have small spherical blossoms bunched into triangular clusters on top of delicate 6-9 inch stems. Grape hyacinths are available in various shades of blue, purple and white.
  • Eranthis (Winter Aconite): A relative to the buttercup, Eranthis unfolds bright yellow, honey-scented blossoms that can carpet the chilly ground and bring life to a dormant rock garden. Plants grow 2-4 inches tall.
  • Galanthus (Snowdrops): The cold is no deterrent to the bell-shaped frosty white flowers of Galanthus. This plant thrives in light shade under leafless trees and is well suited to random planting amidst tough grass. Shorter varieties grow to 4 inches while giant snowdrops reach 10 inches.
  • Leucojum (Giant Snowflake): Drooping bells of white or pink flowers with green tips adorn this frost-hardy 4 inch plant.
  • Pushkinia (Striped Squill): The white flowers of this plant look light blue because of the blue stripes on the petals. Plant in sun or partial shade in well-drained soil. Striped Squill grows 6-8 inches tall.
  • Scilla (Spanish Squill): This late spring-flowering plant has multiple stems with up to 12 bells on each stem. Colors are blue, pink and white. Scilla needs adequate moisture in the flowering season as it grows to 10-12″ in height. Plant in full sun or partial shade.
  • Frittilaria meleagris (Checkered Lily): This small Frittilaria grows to only 9 inches tall compared to its sibling Frittilaria imperalis (Crown Imperial) that grows to a height of 3 feet. The checkered lily’s name is derived from its checker-patterned petals.

Any of these smaller, less obtrusive bulbs can make a great early spring statement in your garden or landscape, bringing it to life long before most spring blooms are at their peak.

snowdrop_250x250

checkeredlily_250x250_3

hyacinth_250x250

Kale, the Super Food

Did you know kale is a super food? Kale belongs to the same family as cabbage, broccoli and Brussels sprouts. It is a rich source of vitamins C, A, & B6, and is loaded with manganese, calcium, copper and potassium, with no fat or cholesterol. Add it to your garden for a healthy harvest!

Planting

In the fall, set out transplants or sow kale seeds about 6-8 weeks before first frost in deep rich soil. Kale will need at least 6 hours of sun per day. Enrich your planting soil with plenty of compost. Planting kale in nutritious soil will promote faster plant growth and thus provide a tender, richer crop. Soil pH should be between 6.5 and 6.8. Sow seeds roughly one-half inch deep and thin seedlings to 8-12 inches apart to provide adequate air circulation. When thinning kale shoots, however, bear in mind that larger spacing will produce larger plants, larger plants produce larger leaves and larger leaves are generally tougher. Keep soil moist and mulch to control weeds. Water when planting and during dry spells.

Harvesting

Don’t worry about frost harming your harvest, a light frost will only enhance the sweetness of kale. Harvest the outer leaves of kale as they are needed for salads and recipes. Young tender leaves will grow from the center of the plant. Use the young leaves for salads and keep older leaves for cooking, which will help tenderize those larger leaves. Kale will continue to produce throughout fall in the warmer sections of our area. In low lying areas or where it is colder, use floating row covers or low tunnels to extend the life of your kale. Kale will bolt (elongate) and flower in the spring. This signifies the end, and it is time to pull it up and compost the remaining plant.

Cooking

Kale may be used fresh or frozen. It may be steamed or stir-fried, or used in soups, stews, omelets and casseroles. It is a tasty base for salads or can be added to sandwiches. It may be used in recipes as a replacement for spinach and collard greens. It even makes fantastic chips!

Kale Chips

  • Preheat oven to 425 degrees Fahrenheit.
  • Clean Kale and spin dry. Remove all the tough stems.
  • Drizzle about 8 cups of leaves with one tablespoon of olive oil and toss to coat.
  • Place Kale leaves in a single layer on a parchment lined cookie sheet.
  • Bake for 10-15 minutes or until leaves are crisp but not scorched.
  • Remove from oven and immediately sprinkle with generous amount of flaky sea salt.
  • Devour!

With so many tasty options for kale and so many nutritional benefits from this super food, there’s no excuse not to add this easy-to-grow dietary wonder to your garden!

kale_close_250x250

kale_250x250

Fairy Garden Magic

Do you think your tiny balcony terrace means you can’t have a grand garden? Are you looking for a clever and imaginative way to introduce a child to the world of plants? Have you ever dreamed of your own “McGregor’s Garden?” One of the newest gardening trends can do all these and a whole lot more!

Start planning…and playing…in your fairy garden!

About Fairy Gardens

One of the newest gardening trends, fairy gardening is the new-and-improved miniature gardening of yesteryear with all sorts of new products, idea books and plants. Despite their small size, the themes, designs and creativity of these tiny garden spaces is boundless. Any container, nearly any type of plant and any type of design can add a bit of garden magic even to a tiny space. Go small and have fun.

Designing a Fairy Garden

You can create your fairy garden just about anywhere. For portability, consider a pot, basin or terrarium. Or, for a more rustic appeal, plant an old lunchbox, garden bucket or child’s wagon. Old shoes, a stack of broken pots, a rusty wheelbarrow or a concrete bird bath are other great planting options.

Fairy gardens can be positioned anywhere. A smaller design can be a fun centerpiece to patio furniture, or it can be part of an entryway display. To heighten the intrigue, find a secret place in your own garden to lure the garden fairies. Between tree roots, beside a water feature or in a grove under flowering shrubs… The possibilities are endless.

Design the overall look of your fairy garden just as you would a larger garden. What is its theme? Is it a fantasyland for unicorns? A gnome family farm? A replica of your own big house? It can be anything you imagine. Consider tiers, layers and depth as well to create a truly impactful scene in your miniature fairy world.

If you’re having trouble coming up with an idea, visit your garden center to check out all the products. If you need some inspiration, our Enchanted Garden products by Grassland Road will get you started. Whimsical and charming, they’ll help you create your own mini-fantasy scene. From arbors and benches to umbrellas and miniature tools, the possibilities are amazing. If you’re not sure your resident garden fairies will understand your invitation, you can always buy a mannequin fairy to entice them to share the fun.

This visit also sets the mind whirling with ideas for plant materials. Consider the mixture of colors, textures, shapes, and scents… in miniature. Tiny groundcovers such as moss or creeping thyme create beautiful “lawns.” Pebbles become paths. Sand creates shores. Twigs make houses, fences and other structures. What can you do with a small pinecone or acorn? How can you recreate a Disney-type pumpkin carriage?

Creativity knows no limits, and the fairies will love you for it!

minigarden_250x250_3

gomegarden_250x250

minigarden_250x250

Winter Pond Prep Checklist

Your pond can be an attractive and valuable focal point of your landscaping, but it can also be a delicate one. As winter approaches, certain steps should be taken to ensure plant and fish survival so your pond will still be at its best next spring.

  1. Clean Out Debris
    Use a netted scooper, a rake, your hands and, if possible, a pond vacuum to clean out pond debris. Rotting vegetation produces gas under winter ice that can be fatal to fish, frogs or other aquatic wildlife. This is also a good time to reduce any mud coverage over the pond’s bottom.
  2. Trim Pond Plants
    Trim and move hardy pond plants to the deep end of the pond (minimum 18” depth) to prevent them from freezing. Cut their vegetative growth back to about one inch above the soil line. Extra foliage will be more delicate and could rot over the winter. Especially be sure to trim any foliage that is already broken, wilting or damaged.
  3. Remove Tropical Plants
    Tropical plants or any delicate vegetation should be removed from the pond and placed in a basement or garage where they will not freeze. Keep plants moist throughout the fall and winter months until it is time to return them to the pond.
  4. Disassemble Summer Equipment
    Remove and clean the pond pump and waterfall or fountain feature (if applicable). Store them inside for the winter. See your maintenance guidelines for proper storage recommendations to keep the equipment in peak condition.
  5. Clean Pond Filter
    Thoroughly clean the pond filter and inspect it for any damage. If necessary, repair or replace the filter.
  6. Change Fish Diet
    Feed fish with spring/autumn food mixtures to provide good nutrition for their slowing metabolism. Stop feeding them completely when temperatures drop consistently below 50 degrees Fahrenheit. Avoid overfeeding, which would contribute to excess debris and decay in the pond over the winter.
  7. Set Up Pond Heater
    If needed, set up your pond heater for winter use. Test the equipment to be sure it is functioning properly and make any repairs or adjustments as needed.
  8. Cover the Pond
    Cover your pond with netting, screening or a shade cloth to minimize debris that will fall into the water throughout the winter. Secure the perimeter with sod staples or rocks to prevent the covering from blowing away. This will make spring cleanup and restarting your pond much easier.
  9. Relax until spring!
    Your pond will be ready for warmer temperatures when you are.

pond_250x250_2

pond_250x250_1

The Fall Vegetable Garden

Fresh vegetables don’t have to end as the days grow shorter – fall is a great time to plant an autumn garden to extend the growing season. Many vegetables such as broccoli or cauliflower are of a higher quality when grown in the fall, while others, like kale, develop better flavor after a frost. Spinach, chard, kale, collards, mustard and rapeseed all grow rapidly and flourish at the end of the season, ideal for autumn gardening. Loose-leaf lettuces do well, too.

To prepare your bed, immediately pull out whatever plants have finished producing. Spade or till the soil to a depth of 6-8 inches, rake the area lightly and work in a light application of composted manure or 5-10-5 fertilizer to provide adequate nutrition for rapid-growing fall veggies.

Broadcast a mixture of seeds like mustard, kale and rapeseed, or combine seeds of several types of lettuce like curly leaf, red leaf and oak leaf to allow you to harvest your salad already mixed. It works best to plant greens in blocks or wide rows, because they’re easier to harvest and you’ll have fewer weeds. If you plant blocks each time a new space opens up, you’ll have staggered plantings that can produce over a long time.

Some autumn vegetable varieties will tolerate cold better than others. Read seed packets before you purchase them to determine what will be best in your area, but don’t be put off by such notations as chard’s taking 60 days to mature. The greens are good when they’re younger, too.

Water seeds after sowing and keep the ground evenly moist until the seedlings are up and growing. Seedlings may also need to be sheltered from extreme heat. Protect them by shading them from the sun with Reemay fabric until they are established.

Although insects tend to be less bothersome in late fall, some vegetables in the cabbage family, including mustard, kale and collards, may attract cabbageworms. Apply Bt (Bacillus thuringiensis) sprays for an organic method of control. As the plants begin to fill out, thin them enough to allow air to circulate and dry off moisture. This helps prevent insect problems too.

Harvest your fall vegetables as soon as the plants reach edible size. Even after the first frosts, you’ll be able to keep harvesting to enjoy the yield of your extended-season garden.

Top Fall Vegetables

  • Broccoli
  • Brussels Sprouts
  • Cabbage
  • Cauliflower
  • Swiss Chard
  • Collards
  • Kale
  • Lettuce, Head
  • Lettuce, Leaf
  • Mustard
  • Rape
  • Spinach
FallVeggie_2FallVeggie_1

Plant a Tree This Fall

There are so many reasons to add a new tree to your landscape this fall that it’s hard to find a reason not to.

Just think about it, trees will…

  • Beautify the Environment
    Trees add texture and color to the landscape. They soften the harsh lines of buildings and driveways, while their foliage and blooms add seasonal color changes and variety.
  • Stabilize Soil
    Tree roots prevent soil from blowing or washing away, minimizing erosion and providing protection for the surrounding landscape.
  • Provide Wildlife Habitat
    Trees provide shelter and food for birds and numerous small animals, including squirrels, raccoons, insects and more.
  • Make Food
    Many trees provide fruits, nuts, seeds, sap and berries for human consumption. Wildlife will also rely on the food provided by trees.
  • Create Oxygen
    Through photosynthesis, trees take in carbon dioxide, carbon monoxide, sulfur dioxide and other poisons from our air and release pure oxygen for us to breathe. One tree can produce enough oxygen for 10 humans for one year!
  • Filter the Air
    Trees act as giant filters trapping dust and pollution particles with their leaves and bark until the rain washes the particles away.
  • Cool the Air
    Air will remain several degrees cooler in the shade of a tree canopy. This is accomplished by not only by blocking the sun’s rays but also through transpiration. Tree leave transpire, or release moisture, which cools the surrounding air. A large tree can release as much as 400 gallons of moisture from its leaves daily.
  • Reduce Utility Bills
    Deciduous trees planted on the south and southwest sides of a home will shade the structure during hot summer months and reduce air conditioning or other cooling needs. In the winter, with the leaves fallen, the sun is able to warm the structure, reducing heating bills.
  • Reduce Noise Pollution
    Strategically planted, trees can dramatically reduce the volume of unwanted noise from loud neighbors, nearby businesses or car traffic.
  • Hide undesirable views
    Purposefully sited, trees can camouflage unattractive views and create privacy, providing a natural sanctuary in your yard.

In our area, fall is just about the best time of year to purchase and plant a tree. The soil is warm, air temperature is cool and morning and evening dew increase available moisture to nurture a new tree. Stop in and see our extensive collection, and we can assist you in choosing the tree that is perfect for your landscape and lifestyle needs.

PlantATree_2

PlantATree_3

PlantATree_1