Author Archives: GCSDev

Ornamental Cabbage & Kale

Looking to add extra appeal to the fall and winter landscape? This year, try ornamental cabbage and kale! Planted alongside chrysanthemums and winter pansies, ornamental cabbage and kale add distinctive bold texture and vibrant seasonal color to the late-season landscape.

Foliage not Flower

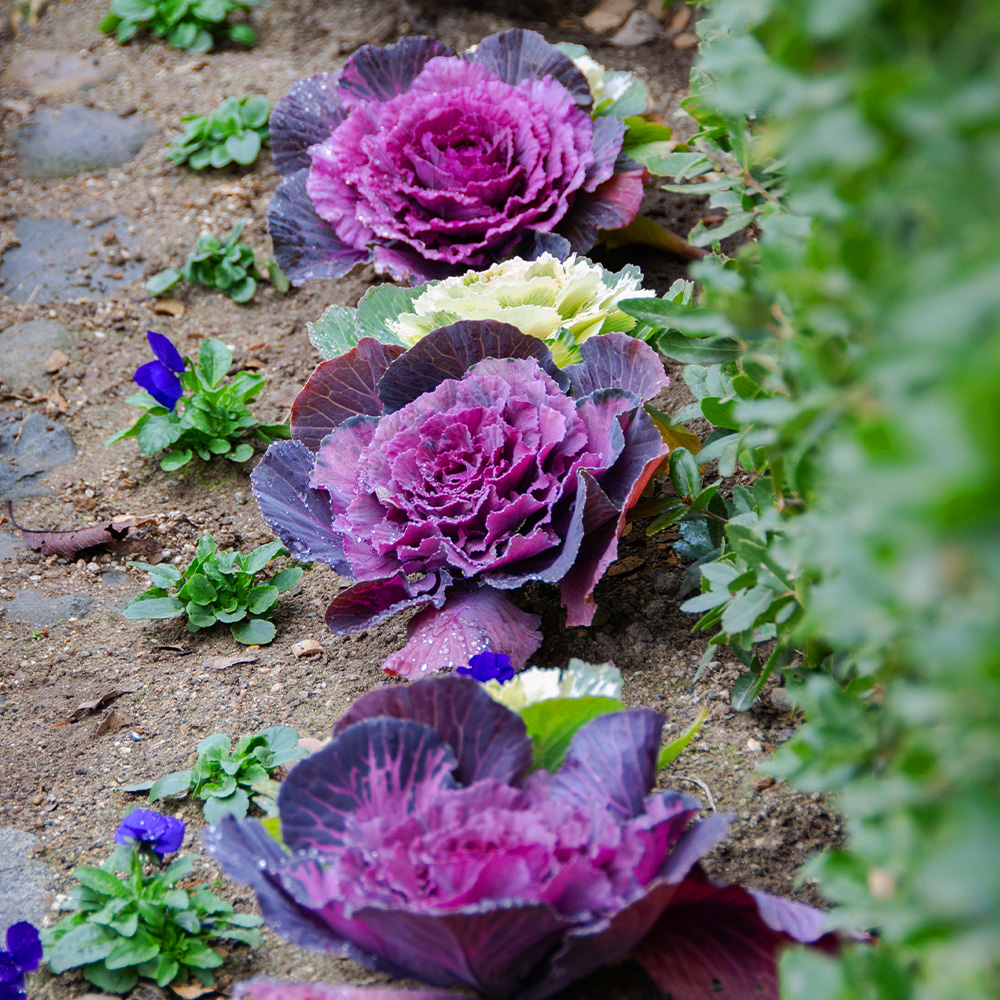
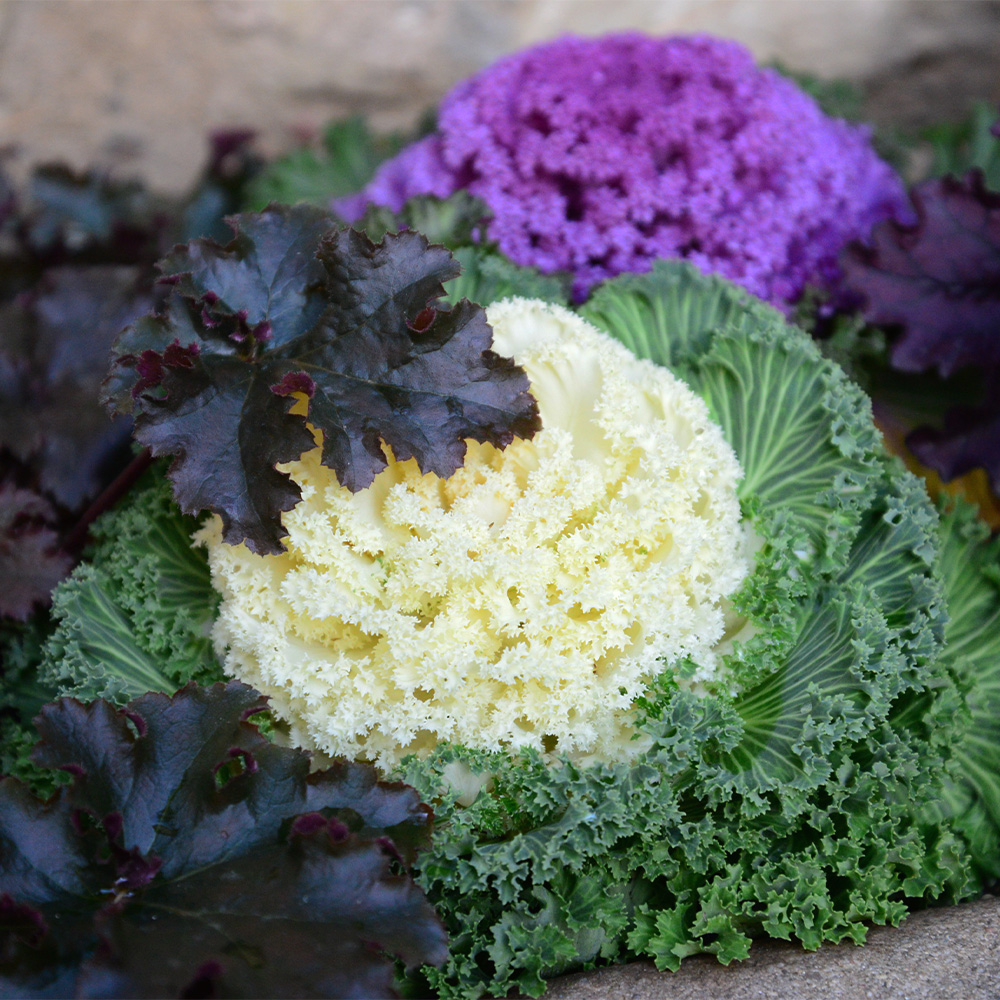
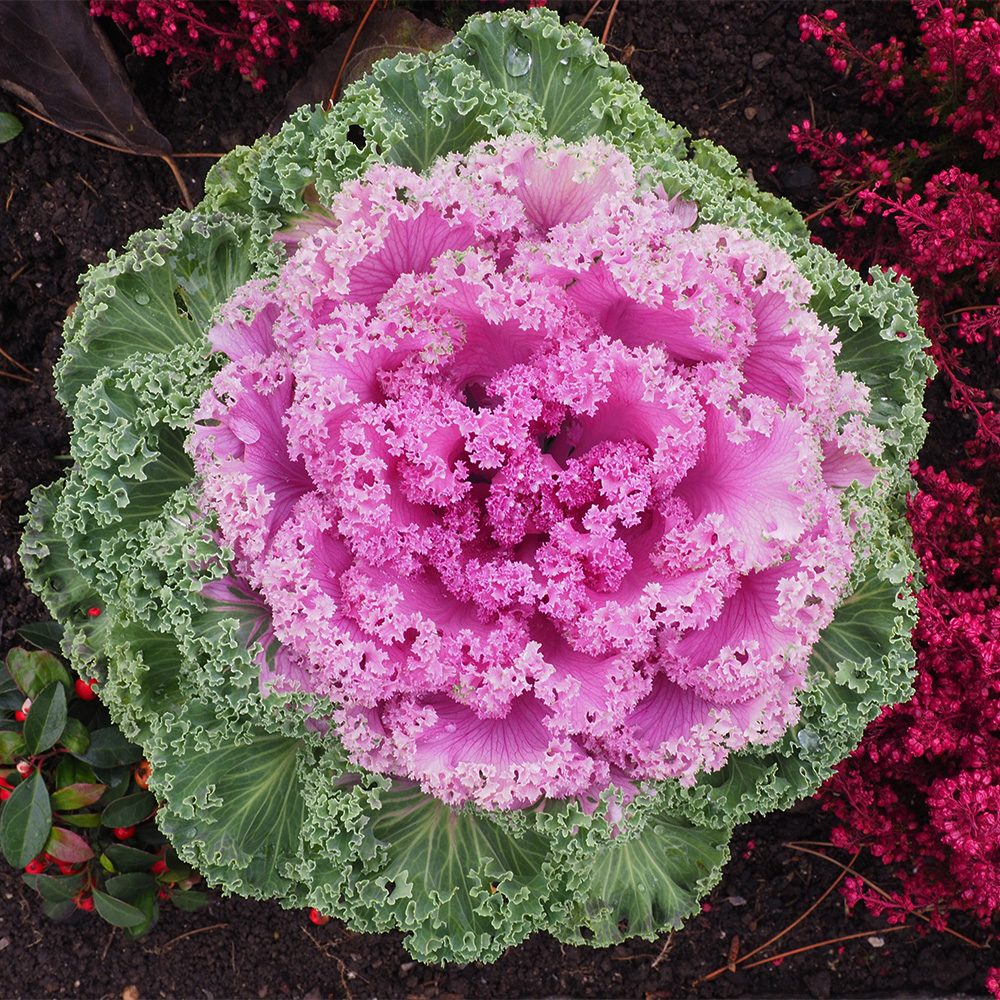
Frequently called ‘flowering’ cabbage & kale, these fall favorites are not flowers at all, but large, dense rosettes of colorful, frilly foliage richly variegated with cream, white, green, pink, rose, and purple – the perfect fall palette.

  • Kale leaves are frilly-edged and sometimes deeply cut or lobed.
  • Cabbage leaves tend to have a smoother appearance with a wavy leaf edge.

While the typical large ornamental cabbage and kale varieties are readily available at this time of year, you can also try more unusual options, including dwarf varieties, suitable for planters, and upright, tall, long-stemmed varieties that are useful in fall floral arrangements.

Unlike most other fall ornamentals, these cold-tolerant annuals improve in appearance after a frost or two, bringing out more intense and brilliant colors in their foliage – perfect for use as both an autumn accent plant mixed with other fall favorites or as a specimen plant, commanding all the attention. Initially select your ornamental cabbage and kale for the leaf texture as the true leaf color will not be recognized until after temperatures have cooled down quite a bit.

Our favorite tried and true varieties include:

Cabbages

  • Color Up
    Grows upright with green leaves surrounding a center of white, pink, or magenta.
  • Osaka Cabbage
    A compact plant with large, smooth, wavy leaves boasting a center of white, pink, or jewel-toned purple.

Kales

  • Crane
    When grown close together, Crane is a tall variety, perfect for cutting and using in floral arrangements.
  • Peacock
    This extra fancy variety sports deeply cut, frilly, loose leaves in purple, magenta, and white.

Planting

Popular in fall borders, grouped in planting drifts, or planted in containers for the deck or patio, ornamental cabbage and kale typically grow to 12-18” high and wide, depending on the cultivar. Plant these fall jewels in September and early October, at least 12” apart, depending on the variety, in an area with full sun that has rich, moist, well-drained soil.

  • In Ground 
    If planting in the ground, add a shovel full of compost to each planting hole to enrich the native soil. Also, sprinkle in a small handful of starter fertilizer to get your cabbage and kale off to a healthy start.
  • In Containers
    When planting in pots, planters, urns, and window boxes, it is best to plant using lightweight, nutritious potting soil. Don’t forget the fertilizer! A slow-release fertilizer will feed your plants, with no additional effort, all season long.

Cabbage and Kale Tip

While these plants are quite similar to the cabbage and kale cooked in the kitchen and consumed in salads, soups, and stews, it is important to note that ornamental varieties are cultivated for color and shape rather than taste. If you’d like to use them in the kitchen, use them as a garnish only. They are more attractive than tasty, and their proper place is in the garden.

Enjoy your ornamental cabbage and kale during the cold months of the year as once they begin to bolt in the spring, sending up their flower stalks, it is time to pull them up and replace them with late spring and summer flowering annuals. This fall, however, try several new varieties planted in both containers and directly into the garden. You’ll love the long-lasting color that they’ll bring to your surroundings.


Building A Simple Raised Bed

It’s a bittersweet time of year. Frost has put to rest another growing season. It is a time for endings as we clean up the garden and jot down this year’s successes and failures. It is also a time for new beginnings, such as planning and anticipating next year’s garden. 

For those who love gardening, the season does not have to end when the cold arrives. The chilly, late-season air is perfect for getting outside and beginning garden projects like building a raised bed garden. A little work now will go a long way come spring.

Why Raised Beds

Just about any plant that is grown in an in-ground garden may be cultivated in a raised bed; this includes flowers, fruits, vegetables, and herbs. Raised bed gardening offers several advantages over growing in the ground; these include:

  • Improved soil conditions
  • Earlier planting
  • Easier maintenance
  • Decreased garden pests
  • Higher crop yield

Building a Simple Raised Bed

Raised beds are available in various styles, materials, and sizes. They may be purchased complete or in DIY kits. If, however, you are adventuresome and thrifty, building your own raised garden bed from scratch is the way to go. 

A home-built raised bed can be made to any size you choose; however, it is best to build the bed no wider than 4 feet. Optimal for ease of planting and maintaining, a raised garden of 4 feet wide will ensure you will never have to stretch further than 2 feet into the bed, a comfortable reach for most.

Materials for a Simple DIY 4’ x 8’ Raised Bed

A 4’ x 8’ raised garden bed is a perfect size. It will provide plenty of room to grow a variety of vegetables, including peppers, tomatoes, lettuce, carrots, radishes, cucumbers, and more. Whereas lettuce only requires a 6-inch soil depth to accommodate its root system, tomatoes, kale, cucumbers, squash, and zucchini need about 16 inches. We recommend building your bed at least 18 inches deep to accommodate plants with a heftier root system.

Note: All wood is not equal. For your bed’s longevity, we recommend using either cedar or white oak. We do not recommend using pressure-treated lumber for a raised bed where edibles will be grown. 

Materials

6 pieces of 2” x 10” x 8’ boards

4 pieces of 2” x 2” x 24’ wooden stakes

Deck screws

Table Saw

Electric Drill 

Electric Screwdriver

Let’s Prepare

  • Gather your supplies and tools, borrowing tools if necessary.
  • Select a full sun site with level ground convenient to a water source.
  • If the selected site is lawn, mow it short and cover it with landscape fabric or a thick layer of cardboard or newspaper to help suppress weeds.
  • To save time and energy, work directly in the area where the raised bed will be situated. 

 Let’s Build

  • Cut 2 of the boards in half, creating four 4’ pieces. Leave the remaining four boards uncut at 8’.
  • Form a rectangular frame with 2 of the 4’ boards and 2 of the 8’ boards.
  • Pre-drill screw holes that will be used to secure the corners – 4 per corner.
  • Fasten the boards together with the deck screws. 
  • Repeat with the remaining boards.
  • Lay one frame over the selected site.
  • Mark the 2” x 2” x 24” stakes with a line 8 inches from the pointed tip of the stake.
  • On the inside of one of the corners of the frame, pound a 2” x 2” stake into the ground up to the 8” line. This will leave 16 inches above the ground.
  • Insert a stake directly inside the frame at the remaining three corners of the bed and pound them into the ground at the 8” line.
  • With the deck screws and drill, secure the frame to the stakes.

Preparing The Raised Bed

Fill

Now is not only the perfect time to build a raised bed but to fill it as well with high-quality topsoil amended with plenty of compost. YOUR GARDEN CENTER will assist you in calculating the amount of soil your specific bed size requires. 

Feed

Organic fertilizers are naturally slow-release. Fertilize your raised bed at soil filling time, and it will be perfect for planting come spring. Select a fertilizer specifically recommended for the crop that you will be growing. 

Protect

Soil should never be left exposed to the elements. Be sure to cover your prepared raised bed soil during the winter. Place a thick layer of salt marsh hay, straw, or leaves atop your soil and leave it in place until ready to plant in the spring. 

Late fall and early winter are the perfect times to build and fill a raised bed. Addressing this late-season chore will keep you gardening in the colder months, assuring that your muscles remain active and will leave you with a lighter workload when spring arrives.


darwin hybrid tulip

Tulip Time

It’s finally here, that time of year that we’ve all been anticipating – fall! And, you know what fall means? Tulip time!

The cooler days of fall entice us back into the garden that the August heat forced us to abandon. This is when your garden retailer is brimming with fresh, new, seasonal plant material and overflowing with fall-planted, spring-flowering bulbs. And, we wish to point out, that no bulb type is more treasured than the tulip. With an almost limitless selection (100 species and over 3000 varieties divided into 15 distinct groups), you’ll never tire of the tulip. 

Tips for Planting Tulips

Tulips are an easy-care addition to any garden or landscape, and they are simpler to plant than many gardeners realize. Tulips need cold winters to stimulate blooms. They flower effortlessly and, in most cases, return for many years in USDA Hardiness Zones 3 – 7. Tulips may be grown in Zones 8 – 11 with a pre-chilling period of 10-14 weeks at 35 to 45°F. In these warmer climates, tulips should be treated as annuals. 

Tulip 10 Step

  1. Choose only top-sized, firm bulbs without bruises or obvious damage. Bigger bulbs generally indicate better quality and will provide more and larger flowers.
  2. Bulbs should be planted as soon as purchased, otherwise store them in a cool, dry location until ready to plant. Plant tulip bulbs before the ground freezes. When planting in Zones 8 – 11, store bulbs at 35 to 45°F until planting time. 
  3. Choose a full or part sun location to plant tulips. A semi-shady location provides some relief from the heat in Zones 8 – 11.
  4. If planting a large number of bulbs, consider digging a free-form bed or trench in which to plant. Individual holes are appropriate when planting a small number of tulips. 
  5. Planting beds and holes should be well-draining, and the soil enriched with plenty of high-quality compost.
  6. Plant tulips at the depth of three times the height of the bulb, approximately 6 inches deep. 
  7. Always plant pointed end up.
  8. Apply a generous amount of bone meal at planting time.
  9. Backfill with the excavated, compost amended soil.
  10. Water the planting area thoroughly and mulch generously after planting tulip bulbs.

Tried & True Tulip Selections

Some tulips can be a little finicky, and while these may disappear from your garden after a year or two, other selections promise trouble-free blooms for years to come if planted and cared for correctly.  The three tulip types that perennialize most readily are…

Species Tulips 

Species Tulips are by far the longest-lived tulips and will even naturalize when given advantageous growing conditions.  Small in stature, species tulips are an excellent choice for rock gardens and for planting in the front of beds and borders.

Darwin Hybrids

Darwin Hybrids perennialize quite well and are valued for their long-stemmed and large brightly colored flowers available in a wide range of hues. These mid-season bloomers make excellent cut flowers. 

Emperor Tulips

Emperors are also good perennializing tulips These modern hybrids are known for their substantial, elongated blooms borne on tall stems. Some even boast decoratively patterned and mottled foliage. 

The temps are cooler, the garden is waiting, and your garden retailer is ready for you. So, what are you waiting for? Take advantage of tulip time and prepare for a bright and floriferous spring! 


darwin hybrid tulip

The Fall Herb Garden

The end of the summer doesn’t mean the end of deliciousness from your garden, not when a fall herb garden can add tantalizing tastes to all your meals. As the season changes, give your herbs a little tender loving care to ensure that they thrive through fall and into winter.

Caring for Perennial Herbs

Perennial herbs that are already established in the garden can easily be winterized, including mint, oregano, thyme, chives, rosemary and sage. So long as the herbs are healthy and thriving as summer wanes, they can be prepared for winter.

First, stop fertilizing herbs in August so they do not continue to produce delicate new growth. Continue to water them adequately, however, as drought stress will make the plants less able to tolerate winter. As their growth slows, trim each plant carefully, using sharp, clean shears for crisp cuts that will minimize strain on the plant. Prune herbs to 4-6 inches in height. It is a good idea to add a layer of mulch to insulate plant roots in colder climates.

Planting Herbs in Autumn

Cool-weather herbs, annual or perennial, can easily be planted in autumn and will be ready to flavor many savory dishes. A container herb garden is an ideal choice for fall herbs since it can be easily moved and protected for the best care. Choose a container with suitable size and depth to nurture the desired herbs, and ensure it has adequate drainage holes to promote good drainage.

Planting several herbs in the same pot will save space and keep them all close by for easy use. You may also consider using smaller pots that can be grouped together in an attractive arrangement. Pots can be positioned right near the kitchen or patio door for easy access, or in a sunny window box.

Protecting Herbs in Winter

Annual herbs or newly planted perennial ones can be at risk if a hard freeze or unexpected storm arrives. Staying alert to weather forecasts and keeping a keen eye on the barometer will help you protect your herb garden as the season deepens. If the temperature is dropping, it is best to shelter your herbs with sturdy covers, cold frames, or cloches. Moving pots or containers temporarily into an insulated garage and near an interior wall that will be warmer can also protect them from cold snaps.

If container herb gardens can safely remain outdoors in the late fall, the pots should be elevated so their drainage holes do not become clogged. Pot feet or plant stands are great options and will help keep the soil from becoming too damp after repeated rains or snows.

Trimming plants into dome shapes is another way to protect the fall herb garden from the onslaught of winter weather. A more compact shape will shed rain and snow more effectively, providing better protection for the plant’s structure and minimizing damage. A dome shape will also be easier to cover if necessary.

Dishes for a Delicious Fall

Fresh herbs add subtle flavors to salads and can be used to season roasts and meats. Infusing soups, sauces, and gravies is another way to create layers of flavor in autumn foods, and herbs can even add unique notes to hot teas, fruit compotes and jellies, or spiced cider. The better you protect your fall herbs, the more you will be able to enjoy them throughout the season and well into winter.

Fall Mulching Pros and Cons

Mulch can add a protective layer to any fall garden, flowerbeds, or shrubs, but is it best for your landscape? Understanding the pros and cons of fall mulching can help you better prepare all your plants for the changing season.

Benefits of Fall Mulching

There’s no denying that when done properly, mulching in fall can provide enormous benefits to the landscape. The biggest pros of fall mulching include:

  • Insulating the soil.
    Fall mulching preserves heat that will keep microbes, earthworms, and other life active and thriving in the soil longer to improve the soil condition. The insulation mulch provides will also help moderate temperature swings that can damage tender roots, especially those of newly planted plant material.
  • Saving time with spring chores.
    Spring is a hectic season in the garden, but if mulching is already done in the fall, it doesn’t need to be redone in the spring and there will be more time to spend with other planting and gardening tasks when the weather warms.
  • Easier climate for working.
    The milder temperatures of autumn make it more enjoyable to spend time outdoors with the heavy labor of spreading mulch. This is especially true if you will be mulching multiple flowerbeds, tree rings, borders, and other spaces throughout the landscape.
  • Simpler to spread.
    If you mulch in spring, you may need to be delicately working around emerging sprouts and blooming bulbs. In fall, however, the work is less delicate after beds have already been cleaned out, and you can spread mulch much more quickly and efficiently.
  • Weed suppression.
    Weeds don’t stop growing when summer ends, and just like spring mulching, spreading mulch in fall will help minimize weeds. This will make it easier to keep weeds under control when spring arrives again, and growth is renewed.
  • Preventing soil erosion.
    Soils on sloped beds can quickly erode in autumn and winter weather as rain and snow batter the slopes. A good layer of mulch will protect the soil and keep it in place throughout the season, so it is ready to work again in the spring.
  • Nourishing the soil.
    Organic mulches that are spread in autumn will have several months to settle and begin decaying. This will introduce more nutrients into the top layer of soil, so it is richer and healthier for spring planting.
  • Tidy Appearance
    A fresh layer of mulch will always make the landscape and garden look well-tended.

Problems With Fall Mulching

While fall mulching can be very beneficial to the landscape, it may not be the best choice for your gardens. Potential cons of fall mulching include:

  • Stopping self-sowers.
    Any herbs or flowers that would normally self-sow as seeds ripen will be inhibited by a layer of autumn mulch, and the yield for new growth in the spring will be significantly reduced. The thicker the mulch, the fewer seeds will germinate.
  • Time constraints of shorter days.
    While the autumn climate may be perfect for big mulching jobs, shorter days and the risk of early snows or freezes can make it difficult to complete the undertaking. If the mulching is started too late in the season, it may not get finished before winter begins.
  • Loss of winter interest landscaping.
    One benefit of fall mulching is that it is easier to spread the mulch over already pruned perennial beds. This same step, however, requires pruning perennial stems back which removes that winter interest from the landscape as it takes away stems, berries, and seeds that winter wildlife may have needed.
  • Attracting unwanted pests.
    A deep layer of fresh mulch can be very attractive to unwelcomed fall and winter guests, including rodents and slugs that will burrow into the mulch and make themselves at home until spring. This problem can be minimized by taking care not to use too much mulch in autumn.
  • Depriving roots of oxygen.
    While fall mulch will help moderate soil temperatures to protect delicate roots, a thick layer may also stifle airflow into the soil and deprive roots of essential oxygen. At the same time, excess moisture that accumulates under a thick mulch layer could lead to problems as well. Be sure to keep your fall mulching to no more than 2 inches deep from plant stem to the dripline.
  • Fading before spring.
    Once fall mulch is laid, it will begin decomposing and could lose its sharp color and freshness long before spring arrives. This can be fixed simply by turning the mulch in the spring to refresh the layer even as new bulbs and shoots are starting to pop up to greet the season.

Fall Mulching Tips

Every gardener must decide when to mulch, and if you do want to take advantage of the benefits of fall mulching, doing so carefully can help prevent many of the cons. First, adjust the mulch depth to match the requirements of your local climate and plant needs – a layer 2-4 inches deep is typically adequate. Apply fall mulch after the first hard freeze when perennials can be cut back easily but take care not to pile it against tree trunks or shrub bases where it may invite gnawing pests or induce bark rot.

Mulching can be a very productive fall chore for flowerbeds, garden spaces, borders, and other parts of the landscape. It has to potential to save you time and energy and help keep your property looking its very best not only in autumn, but through the winter and into spring once again.

Early Spring Gardener’s Calendar

* Plan your summer vegetable and herb garden. We offer a wide selection of seeds that include all of your favorite annuals, perennials, vegetables and other novelties as well as many hard-to-find selections. Inventory your pots and flats and discard unusable ones. Make a list of the supplies you will need. Have your garden soil tested for nutrient content. We offer a variety of do-it-yourself soil test kits.

* Prune woody plants while dormant, including fruit trees, summer- and fall-blooming shrubs and vines. Limit pruning of spring-blooming trees and shrubs to the removal of sucker growth and rubbing or broken branches. Spray trees and shrubs with year-round horticultural oil to reduce insect population.

* Sharpen, clean and oil tools and lawn mowers. Begin heavy annual pruning of shrub roses as new leaves appear.

* Plant pansies, English daisies and primrose as soon as the earth is workable. Plant strawberry plants. Sow cool-season vegetables and herbs in the garden.

* Start spring cleanup and begin major lawn work. Remove debris, dethatch your lawn or aerate compacted areas to improve water penetration.

* Spray needles and limbs of Arborvitae, Cryptomeria, false cypress, fir, hemlock, Juniper, pine, yew and spruce (except blue spruce) for spider mites with year-round horticultural oil.

* Apply fertilizer to perennials and roses with. Feed berry bushes, grapevines, rhubarb and asparagus a balanced 10-10-10 fertilizer before new growth begins. Fertilize trees and shrubs.

*Apply crabgrass preventer with fertilizer to feed the lawn and control crabgrass. Do not use on newly seeded lawns.

* Continue spring cleanup. Cultivate to remove winter weeds and debris from the planting beds. Apply corn gluten or a pre-emergent herbicide with fertilizer specified for gardens and scratch it in to prevent future weeds. Do not use in gardens where you will be direct seeding.

* Reseed bare spots in established lawns. Keep the area moist until seedlings appear, then mow when the new grass is 3? high.

* Prune forsythia and other spring-flowering trees & shrubs after the flowers fall.

* Dig and divide crowded early spring bulbs after they finish blooming. Enrich the soil with bone meal.

* Plant and transplant trees and shrubs, including roses, ground covers, and perennials.

* Transplant cool-season seedlings into the garden. When the soil temperature reaches 60 degrees, sow warm-season vegetable and herb seeds.

* Place gro-thru sets over peonies, grasses or any other perennials in need of support.

Winter Gardener’s Calendar

A perfect time to plan! Curl up with your gardening books and the gardening magazines and catalogs you’ve received in the mail. Get out the gardening journal and start dreaming…

General Landscape

  • Clean up when you get a break in the weather. Remove fallen branches and downed evergreen clumps. Rake leaves to prevent stains on concrete and dead patches on lawn. If freezing weather is still in the forecast, leave the mulch in place.
  • If your Christmas tree is still around, set it where the dropping needles will provide mulch, use the branches as additional insulation for perennials, or get together with neighbors to rent a chipper and create wood chips for larger mulch.

Houseplants

  • Perk up tired houseplants by removing dead and dying leaves. Wash under a soft shower in the sink or tub.
  • Spider mites love living in warm dry winter homes. Check for mites by looking for tiny speckles on leaves.
  • Transplant if roots are growing through the drainage holes or over the pot edge. Pick up some new larger trend-setting colored pots to perk up your décor. Or, if you don’t want to move into a larger pot, untangle the roots and cut back by 1/3, scour the pots and replant with new soil.
  • Remember to turn your plants each week as they begin to grow towards the weaker window light.
  • Plant a terrarium or miniature garden. If you can’t play in the dirt outside, bring the fun indoors!
  • Pick up Valentine flowers. We have a fragrant and beautiful assortment of red, pink or white flowers. Come in and choose from cyclamen, miniature roses, orchids, and other colorful flowers that are the perfect “I love you!”

Vegetables:

  • Plant short-term cover crop such as Fava beans when soil becomes workable.
  • February: Start vegetable and herb seeds indoors:
Broccoli
Cabbage
Celery
Chard
Eggplant
Kale
Kohlrabi
Leeks
Lettuce
Onions, bulb
Peppers
Radicchio
Scallion
Spinach
Tomatoes
Turnip

General:

If you just need a breath of aromatic fresh garden air, stop by and smell ours! The humidity is perfect and will instantly transport you to spring. While here, check out the latest trends in gardening colors, containers, new plant varieties and tools. Of course, we also have a wide selection of books to provide ideas. If you have any questions or need suggestions, we’re here to help. We’d love to see you!

Holiday Gardener’s Calendar

Winter is upon us. Depending upon the temperatures, there may still be time to finish remaining chores. If you have any questions about the following procedures or products, please come in and see us. We can help you select the correct dormant oil, fertilizer, selective herbicide and frost protection method. We’re always here to help.

General Landscape

  • Mulch with bark, compost or other local materials to enrich soil, protect plant roots and prevent erosion.
  • Protect plants from frost and wind.

Houseplants

  • Perk up tired houseplants by removing dead and dying leaves. Wash under a soft shower in the sink or tub.
  • Spider mites proliferate in warm dry winter homes. Check for mites by looking for tiny speckles on leaves.
  • Transplant if roots are growing through the drainage holes or over the pot edge. If you don’t want to move into a larger pot, untangle the roots and cut back by 1/3, scour the pots and replant with new soil.
  • Remember to turn your plants each week as they begin to grow towards the weaker window light.
  • For indoor bloom, plant amaryllis, paper white narcissus, hyacinth, crocus and indoor cyclamen.
  • Popular holiday plants such as poinsettias, chrysanthemums and orchids fill the stores. Check them thoroughly for “hitchhikers” before bringing into the home or spray with household plant insecticide or soap.
  • Be creative in your arrangements and combine them with metallic painted twigs, pinecones or seashells.
  • If using a live tree for a “living Christmas tree”, prolong its time indoors by using Wilt-Pruf to reduce the loss of moisture from the needles.

Lawn:

  • Remove leaves, toys, hoses, etc, from lawns to prevent dead spots.
  • Apply winter fertilizer, if not already done. The middle number, phosphorus, aids root growth during the winter.
  • If you have weeds in your lawn, consider using a winter fertilizer with weed control.
  • Mow one time after lawn goes dormant and before freezing. This last mowing should be 2 ½” tall.
  • When temps are freezing, stay off the lawn as much as possible to reduce blade breakage.

Vegetables:

  • Protect cool season vegetables with row covers, leaf or mulch cover.
  • Mulch beds to enrich and protect from rain/snow erosion.
  • Review gardening notes and plan next year’s garden.
  • Test germination rate of leftover seeds, if wanting to use again.
  • If gardening under lights or in heated greenhouse, start seeds of early spring crops: lettuce, kale, mustard, spinach, and other greens.
  • Harvest carrots, lettuce, greens and over-wintering crops.

Trees and Shrubs

  • Stake young trees and vines if needed. In case of a heavy freeze, use Wilt-Pruf or similar product to reduce transpiration of moisture.
  • Prevent southeast trunk injury, a form of winter freeze damage. Use light-colored tree guards to protect the trunks of young trees for at least two years after planting. After two years, paint the trunks with white latex paint. These two methods prevent the tree trunk from splitting when sunlight warms the bark on side of the trunk.
  • Fertilize shrubs and trees, if not done already, and the ground is not frozen. This allows roots to absorb when temperatures are above 40⁰ and when spring returns. Granules and spikes provide nutrients effectively and easily.
  • Prune out dead and diseased tree branches to prevent from falling on roof or pedestrians.

Choosing a Japanese Maple

We’re certain you’ve heard it numerous times: fall is the best time to buy your Japanese maple. Have you come into the garden center to pick one? Did the varieties overwhelm you? Let us make it easier for you by explaining Japanese maple differences. Then, when you come in, you’ll know exactly what you want.

The species Japanese maple, Acer palmatum, moderately grows to a 20′ by 20′ multi-trunked tree. The leaves have 5-9 finely cut lobes giving them a more delicate look than other maples. Red spring leaves turn to green in the summer and blaze with yellow, orange and red in the fall. All do best with protection from drying winds and hot overhead afternoon sun. During their centuries of use in gardens around the world, gardeners have discovered and propagated those selections with unusual growth habits and bark patterns, as well as leaf color and shape. With hundreds of Japanese maple varieties available at garden centers, we feel a little simplification is in order.

  • Leaf Shape
    The variation Dissectum or Laceleaf Japanese Maple has leaves are deeply cut and finely lobed giving a lace cutout look. These varieties generally grow best in shady locations as the leaves easily burn or scorch. The leaves of non-Dissectum varieties are much less lacy. They resemble the leaves of native maples but are smaller and more deeply cut.
  • Leaf Color
    The leaf color of different Japanese maples also varies. Many have red spring growth changing to green in the summer. However, some retain the red through the growing season. Some varieties have variegated leaves with white, cream, gold or pink. Variegated leaves burn easily in the sun but can revert to all green in too much shade. Green leaves tolerate more sun than red. Autumn is when Japanese maples really put on a show with a riot of blazing colors.
  • Tree Form
    Non-Dissectum varieties grow more quickly into upright forms. Some varieties remain less than 10′ tall but others can grow to 25′ tall by 20′ wide. Laceleaf maples slowly develop a weeping form approximately 8-10′ tall and 8-12′ wide. However, ‘Seiryu’ is an exception, growing into an upright form.

Laceleaf (Dissectum)

Non-Dissectum

Location

More shade

Less shade

Size

Smaller

10-25′ tall depending upon variety

Tree Form

Weeping

Upright

Leaf Shape

Lacy, fine cut

Lobed

Leaf Color

Red, green

Red, green, variegated

Now that you have identified a suitable planting location and the type of Japanese maple you prefer, come see us and let our friendly staff show you the varieties that meet your requirements. Autumn colors are blazing now so this is a great time to make your selection.

maple_choosing_4maple_choosing_1

maple_choosing_3

Birdscaping

As wildlife habitats are threatened by development, the creation of a bird-friendly environment that provides food, water and shelter is crucial to the existence of our wild bird population. Caring for our feathered-friends is an educational and enjoyable activity for the entire family that brings beauty and song to our lives.

Benefits of Wild Birds

Birds are great guests to have in your yard, garden or landscape, and they provide more benefits than many homeowners and gardeners realize. Wild birds can…

  • Control insects by feasting on both flying and crawling insects, as well as spiders, slugs, snails and other creepy-crawlies.
  • Pollinate plants by flitting from flower to flower as they seek out insects or eat seeds, taking pollen along between blooms.
  • Manage weeds as they consume copious amounts of weed seeds before the seeds ever have a chance to sprout.
  • Control rodents when raptors visit the yard in search of mice, rats, gophers, voles or other unwanted pests.

Attracting Backyard Birds

Fortunately, it is easy to attract a wide variety of backyard birds when you offer them what they need most – food, water and shelter.

Food for Birds

Wild birds rely on both natural and supplemental food supplies so it is important to consider both when birdscaping. Feeding the birds is most important in the winter when natural food is scarcer, but they will visit feeders at any time of year. Migratory birds require additional food in the spring and fall as they pass through the region and nesting birds will utilize feeders in the summer.

Tips:

  • Provide a variety of natural foods for birds by planting berry bushes, seed-bearing flowers, nectar-rich flowers and sunflowers. Leave windfall fruit on the ground for birds to nibble. Minimize pesticide use so birds can feast on insects as well.
  • Add supplemental feeders to your yard, such as birdseed feeders, suet feeders and nectar feeders. Clean feeders weekly to avoid mold that can be dangerous to birds, and be sure feeders are full when birds need them most.

Water

Improve your backyard bird habitat by adding water. Birds require a constant supply of clean water for drinking and bathing. This is especially important in late summer, when water is scarce, and in the winter, when it is frequently frozen.

Tips:

  • Place bird baths in a protected location safe from predators, and keep the baths filled at all times so a fresh supply of water is constantly available.
  • Scrub off algae as soon as it is appears and thoroughly was the bird bath each week to minimize feces contamination or other messes in the water.
  • Provide motion for greater attraction by using a bubbler, wiggler, dripper or fountain. Birds will see the sparkles of the moving water and will hear the splashes from great distances, so more birds will visit.
  • Use Mosquito Dunks to safely prevent mosquito larvae in warm weather. A clean bird bath with moving water will also harbor fewer insects.
  • Add an outdoor-safe submersible heater to the bath in winter to keep the water liquid instead of frozen, or consider using a fully heated bird bath during the coldest months.

Shelter

It is important to offer safe and comfortable shelter for your wild birds to nurture their young, protect them from predators and shield them from the elements. Planting evergreen trees and shrubs and providing bird houses, along with roosting boxes and pockets, are all beneficial additions to your birdscape.

Tips:

  • Choose both deciduous and evergreen landscaping trees and shrubs to offer birds different types of shelter in all seasons.
  • Minimize pruning to give birds denser, more secure shelter to take advantage of when they feel threatened.
  • Plant in layers and create thicket-like pockets or corridors in your landscape so birds can move around freely without feeling exposed.
  • Supplement the shelter in your yard with good quality bird houses, winter roost boxes or nesting pockets to give birds even more options to stay safe and secure.

When you meet birds’ needs for food, water and shelter, your birdscape will soon be home to a fun and friendly flock of backyard birds.

Birdscaping_3

Birdscaping_1

Birdscaping_2