Author Archives: GCSDev

Devil’s Darning Needle

Fall is here and after hiding inside in the cool comfort of our air conditioning through the hottest, driest, buggiest time of the year, our interest in revisiting the outdoors is renewed. Reemerging from self-imposed exile into the garden, it is pure joy and a relief to witness the tenacity of late season bloomers that have had to bear, with no assistance or relief, the dog days of summer. One such plant, reliable and prolific, is Clematis virginiana, better known as Devil’s Darning Needle.

Devil’s Darning Needle – also called Devil’s Hair, Love Vine and Woodbine – is a North American native vine. It is very similar in habit and appearance to the Japanese native, Sweet Autumn Clematis (C. terniflora) that most of us are familiar with, yet Devil’s Darning Needle is not as aggressive and can be better controlled in the landscape. C. virginiana is a vigorous, twining, deciduous vine, growing about 15 feet in a season. This plant is in best form when planted next to a supporting structure such as an arbor, trellis, fence, tree or shrub. Its quick growth rate makes this an excellent choice where quick privacy is needed, such as along a fence, shielding a patio or forming a wall around a deck. If unsupported, it will sprawl along the ground.

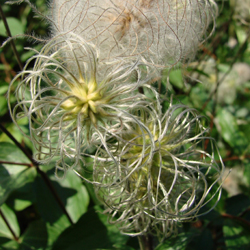
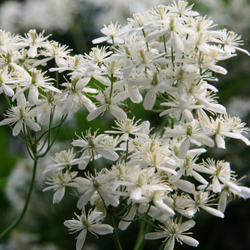
What makes this plant so alluring is its annual, overwhelming display of 1 and 1/4 inch, highly fragrant, star-shaped, pure white blossoms produced in billowy masses in the fall followed by ornamental, silvery, plume-like seed heads. Both flowers and seed heads work well in floral arrangements. Either in the yard or in a vase, this prolific bloomer will not disappoint.

Devil’s Darning Needle is easy to grow. As a low-maintenance vine, it is rarely troubled by pests or disease. It performs well in moist to wet soil of average fertility and prefers full sun to part shade, although it will thrive and bloom in considerable shade. Supplemental watering may be necessary during times of drought. In late winter or early spring, prune C. virginiana back hard to about one foot from the ground to encourage spring growth, but be certain to leave at least two strong buds on each stem. During the growing season, monitor the vine if it is growing through a shrub to make certain that the shrub is not being overwhelmed. No special care is needed to trim it back to control size, but it can be pruned for shape if desired.

Devil’s Darning Needle can be an amazing addition to your landscape, and its late summer and early fall beauty is sure to delight just when other plants begin to fade.

clematis_250x250_2clematis_250x250_1

Minor Bulbs: Perfect Partners for Early Spring Color

A garden stroll in the early spring offers a great deal of promise but generally little color. You can rectify this with a little planning and planting this fall to ensure bright spring blooms to enjoy.

What Is a “Minor” Bulb?

Often passed over at the garden center for showy, larger-flowering bulbs, minor spring bulbs give the garden a head start on spring, extending the season by blooming as early as February and March. These beautifully blossomed seasonal gems are short in stature and produce daintier flowers but, when planted en masse, make as powerful a statement as any daffodil, tulip or hyacinth planting.

Chionodoxa, Muscari, Eranthis, Galanthus and other minor bulbs are planted at the same time as tulips, daffodils and hyacinths, and in the same way, although not so deeply. The general rule of thumb is to plant bulbs three times as deep as the bulb is high. Your soil should be well drained so the bulbs do not rot. Don’t forget to include bone meal in the planting hole for strong growth in the spring.

Minor bulbs make perfect partners for all of your other traditional spring-flowering bulbs. Their size makes them suitable for rock gardens and walkways, as well as filling in spaces between other spring bloomers. They also naturalize well and will help fill in any gaps in a spring garden or wildflower lawn.

Top Minor Bulbs

There are many lovely bulbs with smaller, stunning spring flowers to choose from. Some of the most popular and versatile options include…

  • Chionodoxa (Glory of the Snow): Small, 1 inch white-centered blue or pink flowers appear on leafless stems. Plant in large groups in front of early blooming shrubs or naturalize in the lawn. When grown in shade, blooms last several weeks. Plants grow 4-10 inches tall.
  • Muscari (Grape Hyacinths): Offering the rare and cherished blue color in the garden, Muscari have small spherical blossoms bunched into triangular clusters on top of delicate 6-9 inch stems. Grape hyacinths are available in various shades of blue, purple and white.
  • Eranthis (Winter Aconite): A relative to the buttercup, Eranthis unfolds bright yellow, honey-scented blossoms that can carpet the chilly ground and bring life to a dormant rock garden. Plants grow 2-4 inches tall.
  • Galanthus (Snowdrops): The cold is no deterrent to the bell-shaped frosty white flowers of Galanthus. This plant thrives in light shade under leafless trees and is well suited to random planting amidst tough grass. Shorter varieties grow to 4 inches while giant snowdrops reach 10 inches.
  • Leucojum (Giant Snowflake): Drooping bells of white or pink flowers with green tips adorn this frost-hardy 4 inch plant.
  • Pushkinia (Striped Squill): The white flowers of this plant look light blue because of the blue stripes on the petals. Plant in sun or partial shade in well-drained soil. Striped Squill grows 6-8 inches tall.
  • Scilla (Spanish Squill): This late spring-flowering plant has multiple stems with up to 12 bells on each stem. Colors are blue, pink and white. Scilla needs adequate moisture in the flowering season as it grows to 10-12″ in height. Plant in full sun or partial shade.
  • Frittilaria meleagris (Checkered Lily): This small Frittilaria grows to only 9 inches tall compared to its sibling Frittilaria imperalis (Crown Imperial) that grows to a height of 3 feet. The checkered lily’s name is derived from its checker-patterned petals.

Any of these smaller, less obtrusive bulbs can make a great early spring statement in your garden or landscape, bringing it to life long before most spring blooms are at their peak.

snowdrop_250x250

checkeredlily_250x250_3

hyacinth_250x250

Kale, the Super Food

Did you know kale is a super food? Kale belongs to the same family as cabbage, broccoli and Brussels sprouts. It is a rich source of vitamins C, A, & B6, and is loaded with manganese, calcium, copper and potassium, with no fat or cholesterol. Add it to your garden for a healthy harvest!

Planting

In the fall, set out transplants or sow kale seeds about 6-8 weeks before first frost in deep rich soil. Kale will need at least 6 hours of sun per day. Enrich your planting soil with plenty of compost. Planting kale in nutritious soil will promote faster plant growth and thus provide a tender, richer crop. Soil pH should be between 6.5 and 6.8. Sow seeds roughly one-half inch deep and thin seedlings to 8-12 inches apart to provide adequate air circulation. When thinning kale shoots, however, bear in mind that larger spacing will produce larger plants, larger plants produce larger leaves and larger leaves are generally tougher. Keep soil moist and mulch to control weeds. Water when planting and during dry spells.

Harvesting

Don’t worry about frost harming your harvest, a light frost will only enhance the sweetness of kale. Harvest the outer leaves of kale as they are needed for salads and recipes. Young tender leaves will grow from the center of the plant. Use the young leaves for salads and keep older leaves for cooking, which will help tenderize those larger leaves. Kale will continue to produce throughout fall in the warmer sections of our area. In low lying areas or where it is colder, use floating row covers or low tunnels to extend the life of your kale. Kale will bolt (elongate) and flower in the spring. This signifies the end, and it is time to pull it up and compost the remaining plant.

Cooking

Kale may be used fresh or frozen. It may be steamed or stir-fried, or used in soups, stews, omelets and casseroles. It is a tasty base for salads or can be added to sandwiches. It may be used in recipes as a replacement for spinach and collard greens. It even makes fantastic chips!

Kale Chips

  • Preheat oven to 425 degrees Fahrenheit.
  • Clean Kale and spin dry. Remove all the tough stems.
  • Drizzle about 8 cups of leaves with one tablespoon of olive oil and toss to coat.
  • Place Kale leaves in a single layer on a parchment lined cookie sheet.
  • Bake for 10-15 minutes or until leaves are crisp but not scorched.
  • Remove from oven and immediately sprinkle with generous amount of flaky sea salt.
  • Devour!

With so many tasty options for kale and so many nutritional benefits from this super food, there’s no excuse not to add this easy-to-grow dietary wonder to your garden!

kale_close_250x250

kale_250x250

Fairy Garden Magic

Do you think your tiny balcony terrace means you can’t have a grand garden? Are you looking for a clever and imaginative way to introduce a child to the world of plants? Have you ever dreamed of your own “McGregor’s Garden?” One of the newest gardening trends can do all these and a whole lot more!

Start planning…and playing…in your fairy garden!

About Fairy Gardens

One of the newest gardening trends, fairy gardening is the new-and-improved miniature gardening of yesteryear with all sorts of new products, idea books and plants. Despite their small size, the themes, designs and creativity of these tiny garden spaces is boundless. Any container, nearly any type of plant and any type of design can add a bit of garden magic even to a tiny space. Go small and have fun.

Designing a Fairy Garden

You can create your fairy garden just about anywhere. For portability, consider a pot, basin or terrarium. Or, for a more rustic appeal, plant an old lunchbox, garden bucket or child’s wagon. Old shoes, a stack of broken pots, a rusty wheelbarrow or a concrete bird bath are other great planting options.

Fairy gardens can be positioned anywhere. A smaller design can be a fun centerpiece to patio furniture, or it can be part of an entryway display. To heighten the intrigue, find a secret place in your own garden to lure the garden fairies. Between tree roots, beside a water feature or in a grove under flowering shrubs… The possibilities are endless.

Design the overall look of your fairy garden just as you would a larger garden. What is its theme? Is it a fantasyland for unicorns? A gnome family farm? A replica of your own big house? It can be anything you imagine. Consider tiers, layers and depth as well to create a truly impactful scene in your miniature fairy world.

If you’re having trouble coming up with an idea, visit your garden center to check out all the products. If you need some inspiration, our Enchanted Garden products by Grassland Road will get you started. Whimsical and charming, they’ll help you create your own mini-fantasy scene. From arbors and benches to umbrellas and miniature tools, the possibilities are amazing. If you’re not sure your resident garden fairies will understand your invitation, you can always buy a mannequin fairy to entice them to share the fun.

This visit also sets the mind whirling with ideas for plant materials. Consider the mixture of colors, textures, shapes, and scents… in miniature. Tiny groundcovers such as moss or creeping thyme create beautiful “lawns.” Pebbles become paths. Sand creates shores. Twigs make houses, fences and other structures. What can you do with a small pinecone or acorn? How can you recreate a Disney-type pumpkin carriage?

Creativity knows no limits, and the fairies will love you for it!

minigarden_250x250_3

gomegarden_250x250

minigarden_250x250

Winter Pond Prep Checklist

Your pond can be an attractive and valuable focal point of your landscaping, but it can also be a delicate one. As winter approaches, certain steps should be taken to ensure plant and fish survival so your pond will still be at its best next spring.

  1. Clean Out Debris
    Use a netted scooper, a rake, your hands and, if possible, a pond vacuum to clean out pond debris. Rotting vegetation produces gas under winter ice that can be fatal to fish, frogs or other aquatic wildlife. This is also a good time to reduce any mud coverage over the pond’s bottom.
  2. Trim Pond Plants
    Trim and move hardy pond plants to the deep end of the pond (minimum 18” depth) to prevent them from freezing. Cut their vegetative growth back to about one inch above the soil line. Extra foliage will be more delicate and could rot over the winter. Especially be sure to trim any foliage that is already broken, wilting or damaged.
  3. Remove Tropical Plants
    Tropical plants or any delicate vegetation should be removed from the pond and placed in a basement or garage where they will not freeze. Keep plants moist throughout the fall and winter months until it is time to return them to the pond.
  4. Disassemble Summer Equipment
    Remove and clean the pond pump and waterfall or fountain feature (if applicable). Store them inside for the winter. See your maintenance guidelines for proper storage recommendations to keep the equipment in peak condition.
  5. Clean Pond Filter
    Thoroughly clean the pond filter and inspect it for any damage. If necessary, repair or replace the filter.
  6. Change Fish Diet
    Feed fish with spring/autumn food mixtures to provide good nutrition for their slowing metabolism. Stop feeding them completely when temperatures drop consistently below 50 degrees Fahrenheit. Avoid overfeeding, which would contribute to excess debris and decay in the pond over the winter.
  7. Set Up Pond Heater
    If needed, set up your pond heater for winter use. Test the equipment to be sure it is functioning properly and make any repairs or adjustments as needed.
  8. Cover the Pond
    Cover your pond with netting, screening or a shade cloth to minimize debris that will fall into the water throughout the winter. Secure the perimeter with sod staples or rocks to prevent the covering from blowing away. This will make spring cleanup and restarting your pond much easier.
  9. Relax until spring!
    Your pond will be ready for warmer temperatures when you are.

pond_250x250_2

pond_250x250_1

Bulbs: Increasing Your Yield

When you visit our garden center, you’ll find an incredible variety of autumn “bulbs.” Although they may look strange at this time of year, these “ugly ducklings” will become beautiful swans in your spring garden. It’s hard to imagine how these odd lumps can grow underground and become so gorgeous, but if you plant them now you will enjoy an incredible floral display next spring and summer.

How Bulbs Grow and Multiply

Did you know many bulbs will increase in quantity over time? Most gardeners simply divide their bulbs after a few years and move them to other parts of the garden or give extras away to friends. Dividing your yield is easy when you identify what type of bulb you are dealing with.

There are five distinct types of “bulbs” and although not all of these are available in the fall and some are not winter hardy, it is important to mention them to be able to understand their differences.

BULB TYPE

EXAMPLES

DESCRIPTION

HOW TO DIVIDE (after digging up)

Rhizome

Begonia, Calla, Canna, Ginger, Iris, Lily of the Valley, Tuberose


Grows horizontally from the pointed ends. As this bulb matures, it branches and develops other pointed growing ends. Roots grow from the bottom. Cut the rhizome into sections and ensure each piece has at least one pointed growing tip.
Tuber Anemone, Caladium, Cyclamen, Potato, Tuberous Begonia Buds and roots form anywhere on the surface. Tuber continues to enlarge with more eyes and roots. No basal plate or growing point. Cut the tuber into sections with at least one growing bud and root on each section
Tuberous Roots

Clivia, Dahlia, Daylily, Liatris, Sweet Potato


Actually a swollen root, new tuberous roots grow in a cluster from the base of the plant’s old stem or central crown. Divide the root cluster so each division includes roots and one or more growth buds from the stem base.
True Bulb Allium, Hyacinth, Lily, Daffodils, Snowdrops, Tulips Roundish shape with a pointed tip, covered with scales, and has flattened base plate where roots form. May have a papery outer skin. Forms little bulbs, “offsets” at base. Separate small offsets and plant individually.
Corm

Crocosmia, Crocus, Freesia, Gladiolus


Similar in shape to true bulb however there are no scales. Covered by a “tunic” of fibers. A corm decomposes each year; a new corm develops on top with smaller corms (cormels) on the sides or along the base plate. Separate new corms from smaller corms and plant individually.

Using Your Divided Bulbs

Once you’ve successfully divided your bulbs and bulb-like flowers, what do you do with your extra bulbs? There are many great options…

  • Transplant them into different parts of your yard to create a uniform, coordinated landscape with similar plants.
  • Give them away to neighbors, family members, friends, coworkers or anyone who would like to add new flowers to their yard.
  • Donate them to churches, schools, parks, senior centers or other places where extra flowers for landscaping will be appreciated.

As your bulbs continue to multiply, you will enjoy having more and more to choose from to create your ideal colorful, fantastic floral landscape.

bulbs_4bulbs_1bulbs_2 

Versatile Euonymus

What are your garden’s trouble spots? Do you need an evergreen hedge? A tall anchor plant at the back of a deep garden bed? How about an interesting groundcover? Perhaps your garden needs a medium-sized transition plant. Try a euonymus! This versatile plant does it all, and whatever your landscape needs, this family of plants probably includes your solution. Some are deciduous while others are evergreen, but all are easy to grow and adapt well to a variety of environments.

About Euonymus

With more than 175 varieties of Euonymus available, there is sure to be one to meet your landscaping needs and climate conditions. Evergreen types tend to prefer somewhat sheltered locations, while deciduous euonymus will thrive in full or part sun. Watering should be regular, with more frequent watering (1-2 times per week) in very dry conditions. Well-drained soil is best to prevent root-rot and while richer soil is ideal, euonymus can adapt to nearly any soil type. Pruning can help keep these shrubs compact and neat, and if left unchecked they may outgrow spaces and variegated leaves could revert to plain colors.

Euonymus Varieties in Autumn

In the fall, the burning bright colors of a deciduous euonymus are unmistakable and add rich autumn foliage to the landscape. The strawberry bush (E. americanus) burns bright yellow with scarlet red fruits with orange seeds. The spindle tree, (E. europaeus) has more red in its fall color and the berries are pink or red with white seeds. Probably one of the best known is the Winged Euonymus (E. alatus), often used as a deciduous screen, with unique “winged” twigs and bright red fall color. Choose from a number of different varieties with unique colors and varying mature heights.

The many members of E. japonicus provide solutions for evergreen hedges, edging plants and intermediate-sized shrubs. They range from 1-12′ tall. Some are green, while others have variegated yellow or silver leaf edges. Popular ‘Green Spire’ grows to 7′ tall but at only 1-2′ wide, it creates a narrow and easily maintained taller hedge ideal for screens and privacy. ‘Silver Princess’ grows only 3′ high and wide creates a beautiful silver-tinged border or is a great option for terraces or small bed areas.

For groundcovers, check out the prostrate varieties of E. fortunei such as ‘Coloratus’ (Purple-Leaf Winter Creeper) which turns dark purple in the fall or ‘Wolong Ghost’ with dark green leaves with white veins. There is even a dwarf groundcover, E. fortunei ‘Minimus’ which grows less than 6″ high!

Remember, many of these euonymus varieties add autumn beauty to your garden, so this is an excellent time to see them at their peak and choose which of these unique and stunning plants should be part of your landscape.

euonyms_1

euonyms_2

Redbud Revelry

Gardeners love the Eastern redbud tree (Cercis canadensis). Native to North America, these hardy, slow-growing, small trees richly deserve their places front and center in the landscape. They flower very early in the spring (as early as April), provide beautiful fall color, remain reasonably small, are low maintenance and create quite a display when planted in groupings or as a single specimen. They even grow well in parking lots, sidewalk strips and in containers, making them ultimately versatile for all types of landscaping plans. What else could you ask for?

New and Exciting Redbud Varieties

As if the classic eastern redbud wasn’t beautiful enough, there are always new varieties that give these stunning trees even more charm and character. Which one will be the centerpiece of your landscape?

Recent introductions include ‘Lavender Twist’, which grows in an elegant weeping form, and the compact ‘Ace of Hearts’, which excels in a small garden or container as a blooming, dome-shaped, focal point. ‘Alba’ flowers in pure white and ‘Appalachian Red’ blooms with deep burgundy pink flowers. The leaves of ‘Hearts of Gold’ open red in the spring and slowly change to gold.

‘Rising Sun’ redbud, another new introduction, stops most people in their tracks. In spring, before leaves appear, lavender-pink pea-like flowers cover the trunk and branches. The show really starts when the leaves open and the heart-shaped, deep-apricot colored leaves transition through orange, yellow and gold to lime-green with all colors showing at the same time. In fall, the tree shimmers in shades of gold. Amazing!

Growing Your Redbud

No matter which type of redbud you choose, you’ll want to take good care of it to be sure it reaches its full beauty. First, be sure to plant your redbud in an area where it can stretch to its full size and show off the unique branching growth habit. You will also want to choose a position where the redbud won’t be crowded or overshadowed by other plants. These trees prefer at least four hours of direct, unfiltered sunlight each day, so full or partial sun positioning is best. These are hardy trees and grow well in most soil types, but adding organic material to the soil and mulching around the tree is always a wise idea to protect and nurture it.

Whether planted as a specimen, en masse, or in a container, we’re sure you’ll agree these little trees deserve consideration for a special place in your garden.

redbud_1 redbud_3

Entrance Way Evergreens

Cool and classic or chic and contemporary, no matter what your style, you’ll always be proud of an entrance flanked with beautiful containers highlighting just-right evergreens. In this case, “evergreen” doesn’t necessarily mean a conifer, either – many other shrubs remain green in the winter and can be beautiful showpieces welcoming guests to your home.

Planting Your Container

Entrance way evergreens are generally planted in containers and frame a doorway, walkway or arch. If you truly want your evergreens to take center stage, opt for more understated, neutral containers, but select shapes that match the architecture of your home. You can opt for a boldly colored container, but take care that the container’s decorations won’t overwhelm your evergreens.

You will want to use high quality potting soil for the container to provide adequate nutrition for your evergreens to thrive. Also pay careful attention to the moisture levels, watering the plants appropriately – containers often need more frequent watering than plants in your landscape. You can rotate the containers regularly to help the plants get even sun exposure, and regular fertilizing will help keep them healthy.

If you’re not sure how to plant a container, try this simple formula: “Use a thriller, filler and spiller.” Thriller refers to the tallest or showiest plant, the one that immediately catches the eye. The fillers are the plants surrounding the thriller that add more structure and bulk to the arrangement, filling in empty spaces. The spillers are plants to grow over, and soften, the edge of the container, giving it a more natural, organic look.

Here’s a listing of “thriller” plants to consider for your door decor. We can make recommendations of dwarf cultivars of many of these plants. Dwarfs will take longer to out-grow their container. Happy potting!

  • Shade
  • Azalea*
  • Boxwood
  • Camellia*
  • Evergreen Viburnum*
  • Japanese Andromeda*
  • Heavenly Bamboo*
  • Mountain Laurel*
  • Sun
  • Arborvitae
  • False Cypress
  • Juniper
  • Heavenly Bamboo*
  • Holly
  • Pine
  • Spruce
  • Yews
  • Yucca*


* These plants flower!

Accents for Your Entrance Evergreens

In addition to welcoming your visitors with a beautiful entrance, it’s easy to entertain them and show your style when you accessorize your evergreens. Festively dress your plants to coordinate with seasons or holidays. Fun and creative options include…

  • Spring: Small bunnies, silk spring blooms such as daffodils, pastel Easter eggs
  • Summer: Patriotic flags or ribbons for Memorial Day and the Fourth of July
  • Fall: Scarecrows, pumpkins, Indian corn, Halloween decorations
  • Winter: Holly sprigs, tiny twinkling lights, beaded garlands, snowflake ornaments

You can also personalize your entrance evergreens for birthdays, anniversaries or to showcase your favorite teams, colleges, hobbies and more. All are easy to do, fun, and affordable, and make your entrance truly eye-catching.

entrance_way_2entrance_way_1

Fall-Blooming Camellias

We love camellias! An Asian native and an old southern standby, they are now a favorite in the northern states as well. In recent years, new varieties have been developed for their increased cold hardiness, giving northern gardeners even more opportunities to enjoy these charming beauties. Blooming in October, November and even into early December, fall-blooming camellias provide an abundance of colorful showy blooms that can now be enjoyed in colder climates.

Camellias do best in rich, moist, well-drained, acidic (5.5-6.5 pH) soil. Plant camellias in a location where they will be protected from the drying winter sun and wind or else the delicate blooms may suffer. Because these shrubs are shallow-rooted, they should be planted no deeper than they are planted in the pot that you purchase them in. Apply 3-4 inches of mulch to the root zone to keep soil moist and control weeds. Compost added to the soil can also help provide suitable nutrition to keep these plants healthy. Water camellias first when newly planted and frequently during times of low rainfall – a drip system can be a great option to keep these shrubs suitably moist. Fertilize in the spring with a fertilizer specified for acid-loving plants. If purchasing and planting camellias in the fall, be sure to give them a little extra TLC to help them through their first couple of winters and they will reward you with their beauty for years to come.

To help you choose the most beautiful fall-blooming camellias for your landscape, consider these attractive cultivar options!

  • Ashton’s Pride: Lavender-pink, single flowers with yellow centers
  • Ashton’s Snow: Creamy white flowers in semi-double blooms
  • Long Island Pink: Single blooms with bright pink colors and ruffled petals
  • Mason Farm: Pink, single flowers with a white tinge
  • Northern Exposure: Pink buds that open to single white, papery flowers
  • Winter’s Darling: Deep pink flowers with anemone shapes
  • Winter’s Fancy: Deep rich pink, semi-double blooms
  • Winter’s Interlude: Light pink blooms with anemone shapes and peachy centers
  • Winter’s Joy: Bright bold pink, semi-double blooms
  • Winter’s Star: Single lavender-pink pale blooms with yellow centers
  • Winter’s Water Lily: Elegant white flowers with a formal double shape

No matter which fall-blooming camellia you choose, if you give it the proper care, it will love you right back with abundant growth and stunning blooms that bring an air of southern charm and hospitality to your yard.

camellia_250x250_3camellia_250x250_1

camellia_250x250_2